
senthryX
A server-side mod that implements a username-IP-based whitelist system, enforcing access control based on both username and IP address. Includes Discord…
⬇ Download on Modrinth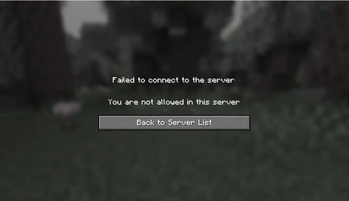
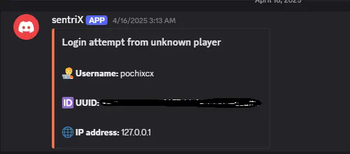
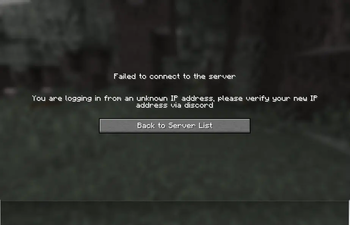
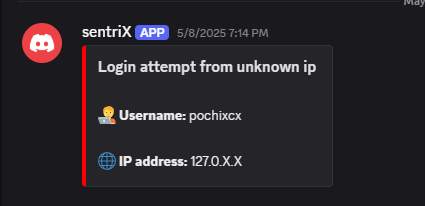
Disclaimer: > This mod collects and logs player IP addresses solely for the purpose of maintaining server integrity, and enforcing username-IP-based access control. All collected data is used exclusively for the features provided by this mod.
Before using this mod, server administrators must ensure:
Player Consent: Players must be informed and acknowledge that their IP addresses will be collected and linked to their usernames for access control.
Data Use: Collected IPs are used solely for access enforcement and are stored internally — never shared outside the server staff.
Data Security: Server owners are responsible for securing this information and ensuring only authorized administrators have access.
Description
SenthryX is a server-side whitelist mod that binds usernames to specific IP addresses. It enforces strict access control by allowing only whitelisted and trusted players to join the server. This prevents unauthorized access, blocks login attempts from unbound IP addresses, and protects against username spoofing. SenthryX is especially recommended for servers running in offline mode. It also supports multiple IP bindings per player, making it compatible with dynamic IP addresses. For added convenience, SenthryX integrates with a Discord bot that provides real-time alerts for failed login attempts and enables server management through bot commands, the bot integration can also be disabled.
Features
Access control based on username and IP address
Whitelist players by username and IP using commands like
whitelist_add player1 127.0.0.1(Discord) orsenthryx whitelist add player1 127.0.0.1(console).Players can only connect from approved IPs tied to their usernames; multiple IPs per user are supported.
Blocks connection attempts from unknown players or unapproved IPs.
Supports adding new IPs for users with dynamic addresses.
Discord bot integration:
- Access attempt alerts.
- Manage whitelist entries directly from Discord.
- Enable or disable Discord bot feature as needed.
Installation guide
Download the Mod
- Download the mod here.
Install the Mod
Place the downloaded mod file into the
modsfolder within your Minecraft directory.In
server.properties, it’s recommended to disable the built in whitelist (white-list=false) to allow the mod to fully handle access control based on usernames and IPs.- Optionally, you can leave the built in whitelist enabled for an additional layer of security, but this is not required.
Initial Server Startup
- Start or restart your server. On the first startup, an error is expected—this is normal. During this process, a file named
config.jsonwill be generated in theconfig/senthryXdirectory.
- Start or restart your server. On the first startup, an error is expected—this is normal. During this process, a file named
Configure the Discord bot if you want to enable the Discord integration feature. See the details for step by step process below.
Configure the Mod
- Open the
config.jsonfile and adjust the settings as needed. Refer to the Configuration Values section below for guidance.
- Open the
Restart the Server
- Once you’ve configured the config.json file, restart your server to apply the changes.
Configuration Values
Click to expandTo configure, navigate to /config/senthryX/config.json
| Key | Value | Description |
|---|---|---|
| activate | boolean | Enables or disables the mod. Set to true to enable, or false to disable it. |
| enable_discord | boolean | Enables or disables Discord integration. Set to true to use the Discord bot, or false to turn it off. |
| bot_token | String | Your Discord bot token. Required for the bot to connect to your Discord server. |
| admin_channel_id | String | ID of the Discord channel where admins can run commands like whitelisting players. |
| enable_public_logging | Boolean | Enables or disables public logging. Set to true to post logs in a public channel. |
| public_log_channel | String | ID of the Discord channel where public logs will be sent. |
| admin_ids | Array of Strings | A list of Discord user IDs who have admin permissions for using bot commands. |
| presence | String | Custom status text shown by the Discord bot (e.g., “Watching the server”). |
| kick_message | String | Message shown to players who are not whitelisted. You can customize this. |
| unknown_ip_message | String | Message shown to players connecting from an unknown IP address. You can customize this. |
Console Commands
Click to expand| Command | Usage |
|---|---|
/senthryx whitelist add <username> <ip> |
Command for whitelisting a player. |
/senthryx whitelist remove <username> |
Command to remove a player from whitelist entry. |
/senthryx ip add <username> <ip> |
Command to add a new ip for player. |
| /senthryx reload | To reload the player list in case of editing player list file manually |
| /senthryx count | To count total whitelisted players. |
Discord Admin Commands
Click to expand| Command | Usage |
|---|---|
/whitelist_add <username> <ip> |
Command for whitelisting a player. |
/whitelist_remove <username> |
Command to remove a player from whitelist entry. |
/add_ip <username> <ip> |
Command to add a new ip for player. |
| /player_count | To count total whitelisted players. |
Configure Discord Bot
Click to expandStep 1: Create a Discord Bot
Go to the Discord Developer Portal
Click "New Application", give it a name (e.g., MinecraftBot), and click Create.
In the left sidebar, go to Bot → Click Add Bot → Confirm by clicking Yes, do it!.
Step 2: Get the Bot Token
Under the Bot section, click "Reset Token" or "Copy" under the Token field.
Save this token somewhere secure — you'll need it in the config file(Do not share this token. It gives full control of your bot.).
Step 2: Get the Bot Token
Still under the Bot section:
Scroll down to Privileged Gateway Intents.
Enable: - Presence Intent
Prensence Intent
Server Members Intent
Message Content Intent
Click Save Changes at the bottom.
Step 4: Invite the Bot to Your Discord Server
Go to the OAuth2 → URL Generator section.
Under Scopes, check:
- bot
Under Bot Permissions, check:
Send Messages
Read Message History
Copy the generated URL and open it in your browser.
Select your server and click Authorize.
Step 5: Configure Your config.json File
- Now edit the
config.jsonfile located in /config/setrix/. Here’s an example:
- Edition: Minecraft Java
- File type: .jar
- Minecraft version listed: 1.21.4
- How to install: Install the matching mod loader (Forge, Fabric or NeoForge) for your Minecraft version. → Download the .jar. → Put it in the .minecraft/mods folder and launch that loader profile.
- Where to get it: Opens on Modrinth — not every file is mirrored on our own servers.
Install steps are the general flow for this file type — How to install Minecraft Java mods & modpacks walks through it step by step.
- Ships as senthryX-1.5.0.jar — drop this file into the mods folder
- Download size: 9.6 MB
- Download link checked 10 Sept 2026 — working
These come from our own check of the pack file, not from the source page.