
SkinSpice

SkinSpice is a Minecraft resource pack that allows you to customize your skin a bit more with the help of Vanilla core shaders. That's right, no mods are required to use SkinSpice features!
Features
Blinking Eyes: Make your character blink by adding a frame with closed eyes to your skin. You can even customize the blinking speed and whether the animation is interpolated or not.
Custom Damage Tint: Change the color of the red tint that appears when your character takes damage.
Downloading SkinSpice
Installing the resource pack is simple, and the same as with any other resource pack:
- Download the latest version of the resource pack on Modrinth and place it into your Minecraft
resourcepacksfolder. - Enable the resource pack in Minecraft.
Now, when you encounter any player with a skin that uses SkinSpice features, you will see the effects.
Adding SkinSpice features to your skin
Before we begin, you'll need to have your skin image. You can download your current skin from minecraft.net (Edit Skin Page) or use any skin you have saved locally.
Easy route: Using the web tool
This part can get a little tedious. Fortunately, I have created a web tool to add SkinSpice features to your skin. You can find it here: https://skin.golmc.cz (or click the badge below)

Harder route: Manually edit your skin
To add SkinSpice features to your skin manually, you'll need to edit the skin image using an image editor that supports transparency (like Photoshop, GIMP, or Paint.NET).
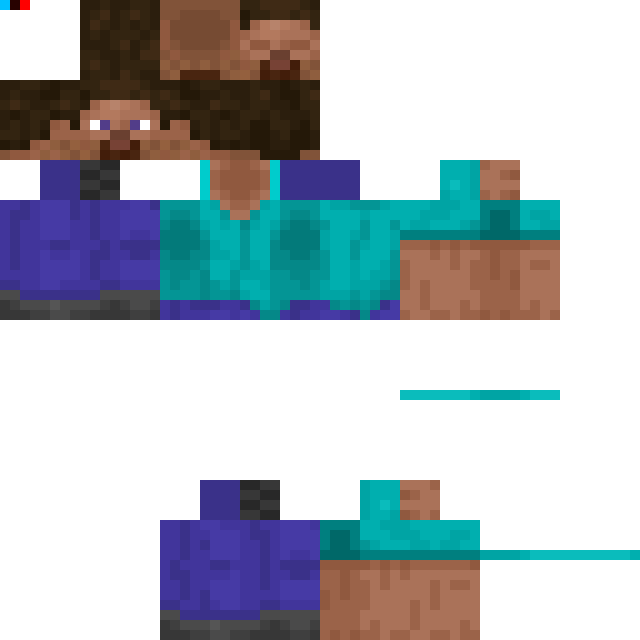
If you get lost along the way, you can refer to the example image of the Steve skin with SkinSpice features provided below nearly at the end of this README.
Blinking Frame
You must add a frame of your face with closed eyes. This can be done by just copying the front face texture and modifying the eyes to be closed.
Then, place this new frame between these two coordinates on your skin image: [24, 0] and [31, 7]. This area is located above the back texture of the head and on the right size of the bottom texture of the head.
Next, do the same for the overlay layer of the head (if your skin has one). The area where you need to place this frame is the same as for the base layer, relative to the overlay layer. But just for completeness, the coordinates for the overlay layer are between [56, 0] and [63, 7].
Unless your skin does not have an overlay layer for the head, you must add the blinking frame to both the base layer and the overlay layer of the head. Not doing so will result in visual glitches during the blinking animation.
Control Pixels
All of these pixel must be fully opaque, meaning they must not be transparent at all.
- A pixel located at coordinates [0, 0] (top left) needs to have exactly the values of this HEX color code:
#00c0ff. - Another pixel located at [1, 0] (to the right of the previous) is used to customize blinking values.
- The red channel value sets the duration of the first (vanilla) frame of the face. The values is in 1/10th of a second, which means a value of 40 will be 4 seconds.
- The green channel value sets the duration of the second (custom) frame of the face. The values is in 1/10th of a second, which means a value of 40 will be 4 seconds.
- The blue channel decides if the animation should be interpolated. If the value is exactly 0, then no interpolation will be done, otherwise the animation will be interpolated.
- Additionally, if you want to customize the damage tint, a pixel located at [2, 0] is used for that. The color of this pixel is directly used for the new color of the damage tint.
Reference Image
Here is a reference image showing where to place the blinking frame and control pixels:
License
SkinSpice is licensed under the MIT License. Feel free to use and modify it as you see fit!
- Edition: Minecraft Java
- File type: .zip (resource pack)
- Minecraft versions listed: 1.21.9, 1.21.10
- How to install: Download the .zip resource pack — do not unzip it. → Put it in .minecraft/resourcepacks. → Enable it in Options → Resource Packs.
- Where to get it: Opens on Modrinth — not every file is mirrored on our own servers.
Install steps are the general flow for this file type — How to install Minecraft Java resource packs walks through it step by step.
- Downloads as SkinSpice.zip
- Download size: 74 KB
- Download link checked 5 Sept 2026 — working
These come from our own check of the pack file, not from the source page.