ZSTDNET
Java mod listed for Minecraft 1.20–1.21. Downloads from the MC Java Mods app on Android.
Use ZSTD to compress and relay traffic between the client and server, aiming to reduce public bandwidth usage in high-redundancy data scenarios.
I don't know my version or loader
ZstdNet (v1.4.7)
ZstdNet is a Minecraft Java Edition mod that uses ZSTD to compress relayed traffic between clients and servers. It is designed to reduce public bandwidth usage in high-repetition modded traffic, especially for large Create-based modpacks, FRP/NAT traversal setups, tunnel forwarding, and singleplayer LAN hosts who want to share a more bandwidth-efficient external entry point.
ZstdNet handles forwarding and compression. If you still want premium account verification while keeping the backend offline, you can pair the setup with a mod such as TrueUUID[ https://www.curseforge.com/minecraft/mc-mods/trueuuid ]
Highlights
- Automatically starts a temporary local client proxy when joining a ZstdNet address.
- Provides a compressed server-side entry point and forwards traffic to the backend Minecraft port.
- Supports dedicated servers and LAN worlds hosted from singleplayer.
- Supports default auto-takeover mode so dedicated server players can keep using the same public address and port.
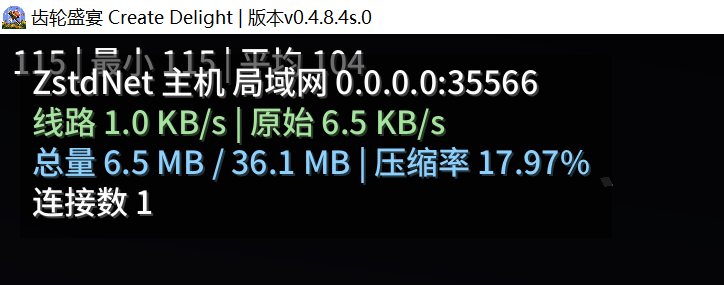
- Includes an in-game HUD for connection mode, throughput, total traffic, compression ratio, and connection count.
- Keeps vanilla server-list ping passthrough working normally.
- Provides same-port UDP passthrough on the client-side local proxy for mods such as Sable / Create Aeronautics.
- Provides raw UDP passthrough routes for Simple Voice Chat and similar UDP voice setups.
Real-World Result Example
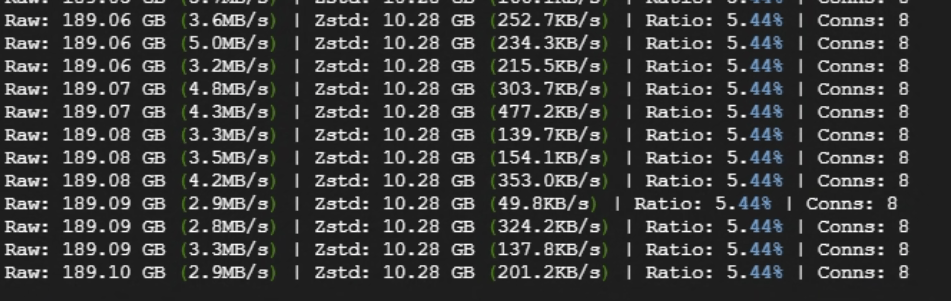
The main purpose of this mod is to reduce public bandwidth usage caused by highly repetitive packet traffic. In large modpacks, compression gains can be significant. Example server-side stats from a real Create-based environment:
Raw: 189.06 GB (3.6MB/s) | Zstd: 10.28 GB (252.7KB/s) | Ratio: 5.44% | Conns: 8
Raw: 189.06 GB (5.0MB/s) | Zstd: 10.28 GB (234.3KB/s) | Ratio: 5.44% | Conns: 8
Raw: 189.06 GB (3.2MB/s) | Zstd: 10.28 GB (215.5KB/s) | Ratio: 5.44% | Conns: 8
Raw: 189.07 GB (4.8MB/s) | Zstd: 10.28 GB (303.7KB/s) | Ratio: 5.44% | Conns: 8
The lower the ratio, the less traffic is actually transmitted after compression.
Supported Versions
This repository currently provides builds for:
- Forge 1.20.1
- NeoForge 1.20.1
- NeoForge 1.21.1
- Fabric 1.20.1
- Fabric 1.21.1
Installation
Recommended installation depends on how you use it:
- Joining a remote ZstdNet-enabled server: install ZstdNet on the client.
- Hosting a dedicated server with the built-in ZstdNet entry: install ZstdNet on the server.
- Opening a singleplayer world to LAN and sharing a Zstd entry externally: install ZstdNet on the host client.
Installing it on both client and server is recommended for the smoothest experience.
Local Traffic Dashboard
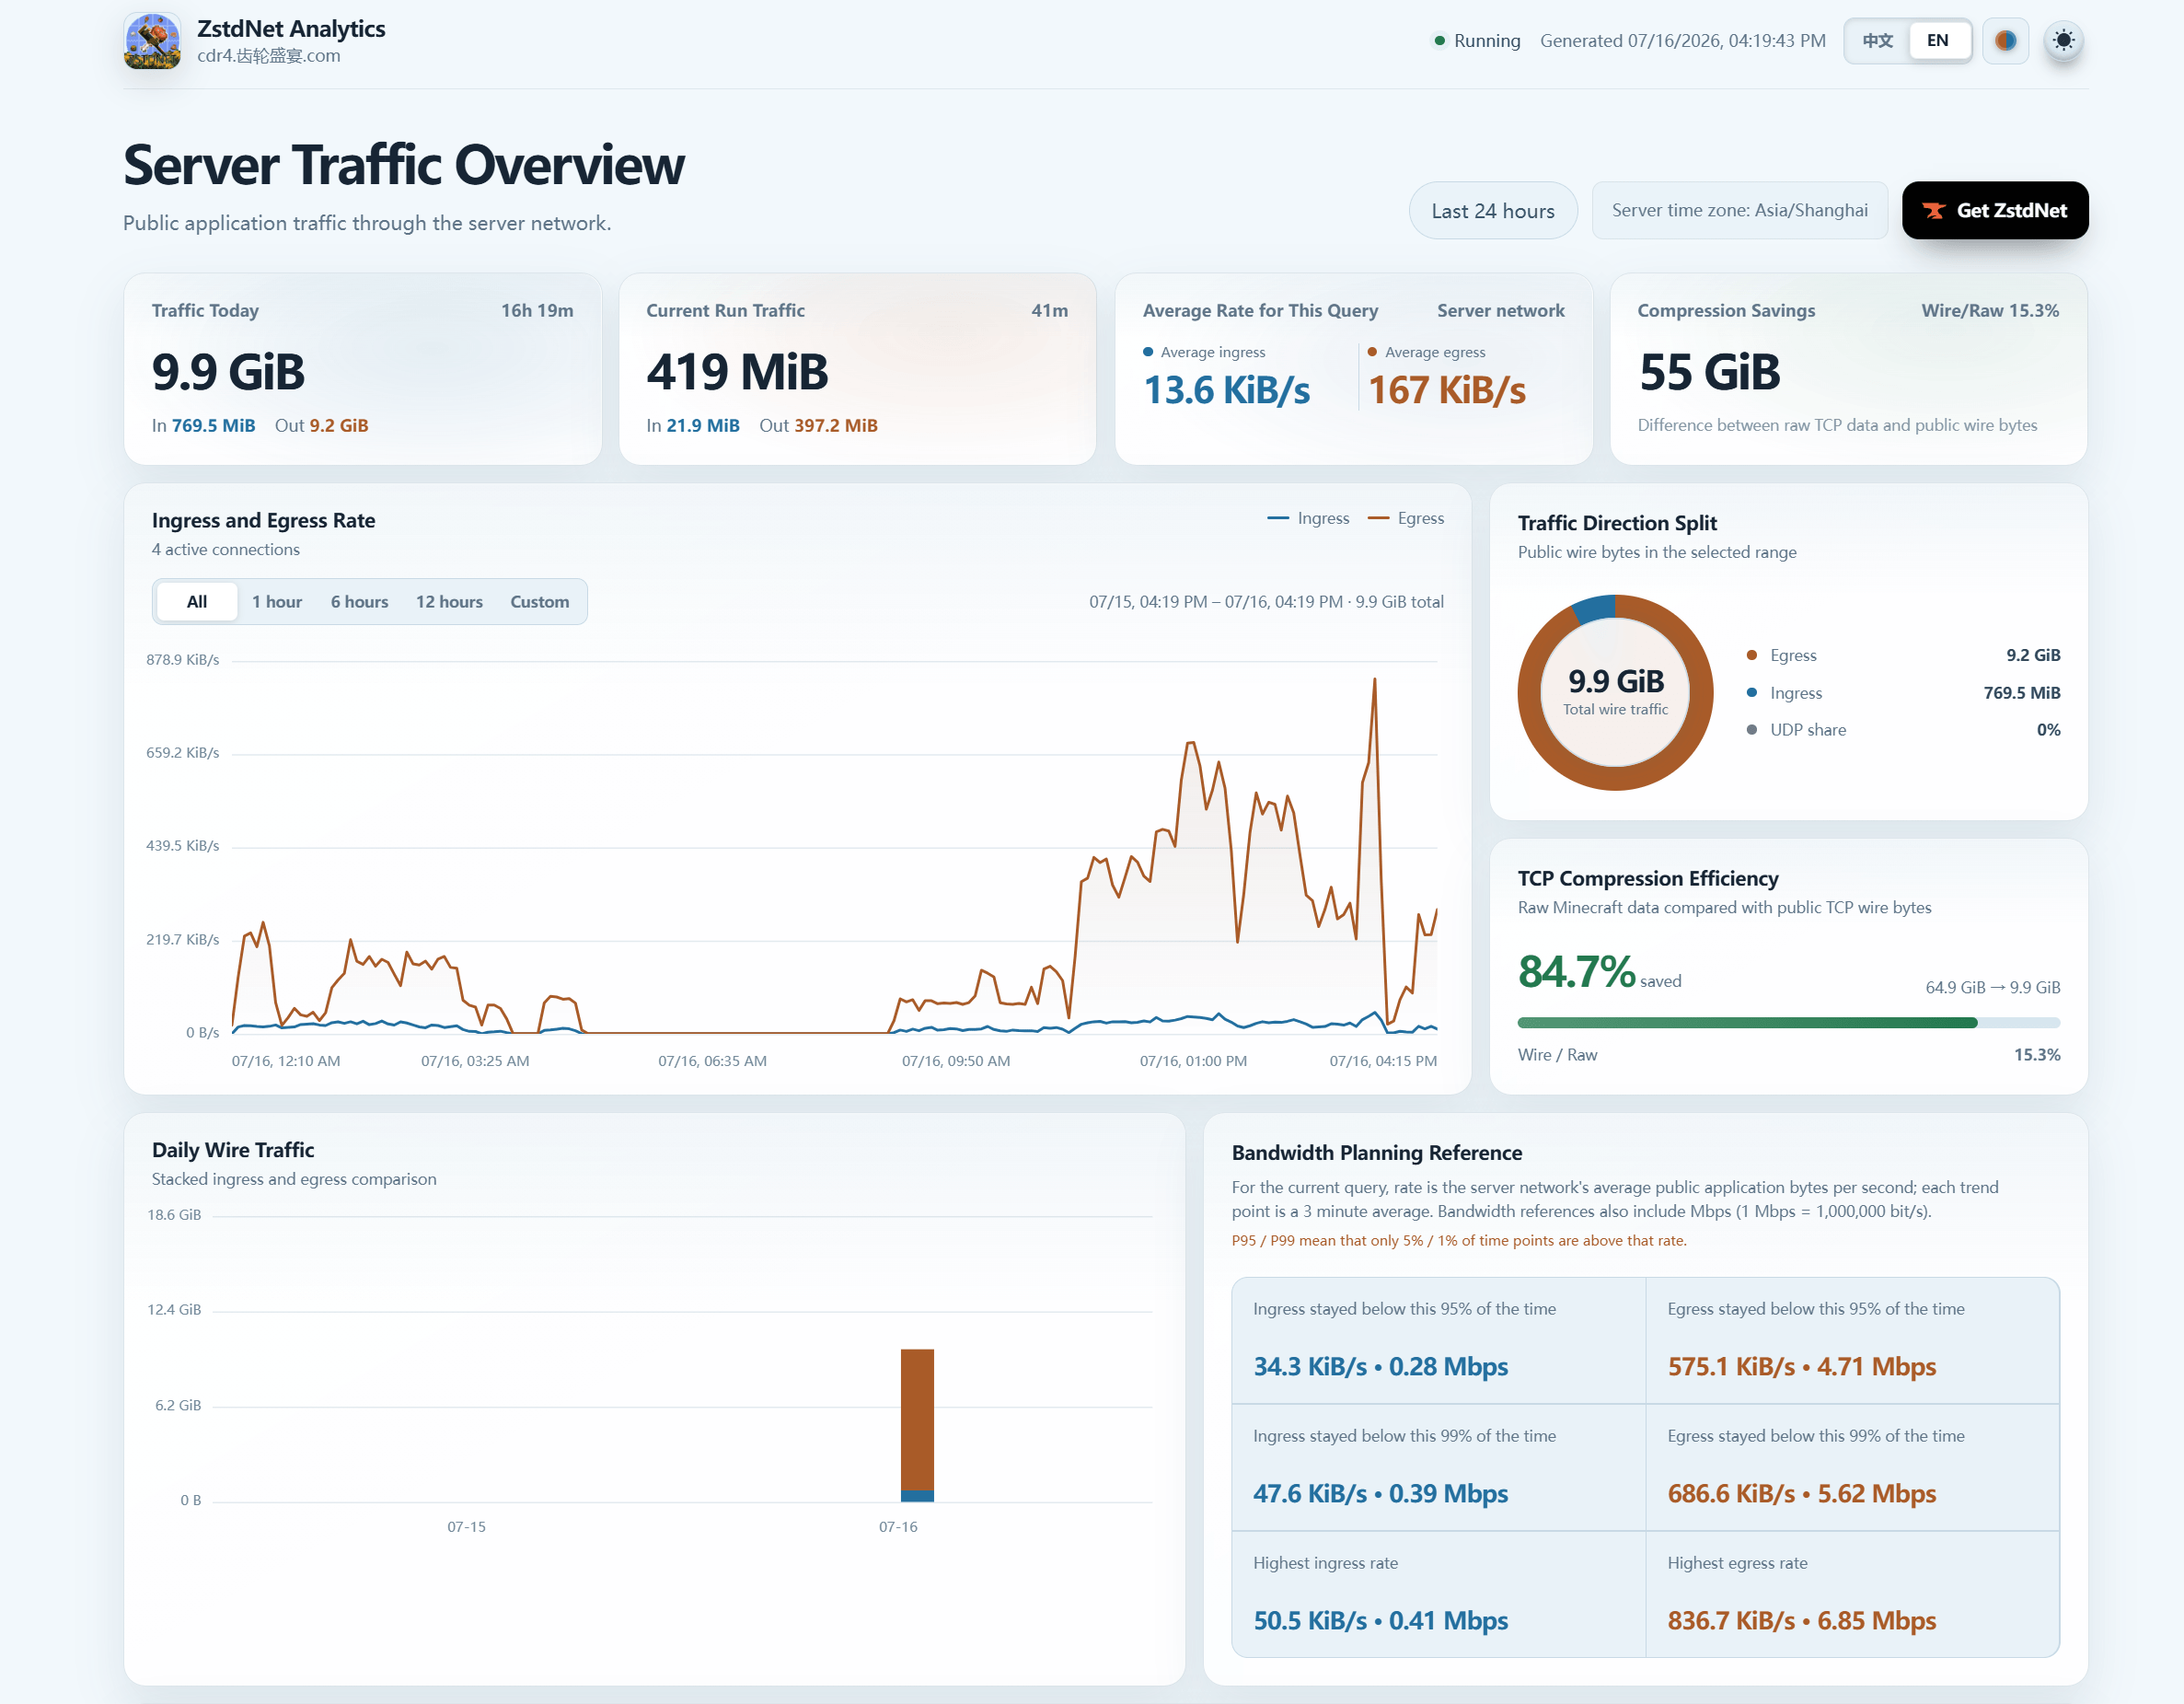
The server automatically stores daily totals, five-minute time series, and per-run history. TCP, UDP, ingress, egress, raw bytes, and wire bytes are tracked separately under config/zstdnet/stats/.
Players with command permission level 2 can request a report from a modded client:
/zstdreport today
/zstdreport session
/zstdreport 24h
/zstdreport 7d
/zstdreport 30d
The server returns only aggregated JSON over the game connection. The client generates a self-contained HTML file under .minecraft/config/zstdnet/reports/ and adds a clickable "Open traffic dashboard" message in chat.
The report page provides All, 1-hour, 6-hour, and 12-hour filters plus any custom start and end inside the report. A /zstdreport 30d report also provides 1-day and 7-day filters. The trend chart, traffic summaries, direction split, and bandwidth reference update together.
The dashboard supports dark and light modes plus ten color presets: Default, Minimal Mono, Midnight, Rose Garden, Aurora, Sunset Glow, Forest Whisper, Sea Breeze, and Lavender Dream. Every preset uses a high-contrast ingress/egress pair. Bandwidth reference values are shown in both KiB/s and Mbps, where 1 Mbps = 1,000,000 bit/s. Theme choices are stored locally by the browser.
How Players Connect
With the recommended dedicated-server setup, keep:
auto_takeover=trueIn this mode, players usually keep using the same public address and port they already know, for example:
play.example.com:25565
1.2.3.4:25565
ZstdNet automatically takes over the public server port from server.properties, moves the backend Minecraft server to another local port, and forwards compressed traffic internally. Players do not need to learn a second port just for ZstdNet.
Only when auto_takeover=false is used in manual mode do players need to connect to the configured listen port.
Dedicated Server Setup
On first launch, ZstdNet generates:
config/zstdnet-server.propertiesThe recommended default is:
enabled=true
auto_takeover=true
With this setup:
- Players keep connecting to the original public port.
- ZstdNet uses that port as the compressed public entry.
- The backend Minecraft server is moved to another free local port automatically.
listenandtargetusually do not need to be manually planned.
If you use FRP, HAProxy, NAT traversal, or any other forwarding layer, make sure the public entry forwards to the ZstdNet listen port. Do not forward directly to the backend vanilla game port, or compression will be bypassed.
For same-port UDP mods such as Sable / Create Aeronautics, make sure the forwarding layer forwards both TCP and UDP on the same public port.
Backend Server Notes
For dedicated server proxy-style setups, the backend Minecraft server should run with:
online-mode=falseZstdNet handles forwarding and compression. If you still want premium account verification while keeping the backend offline, you can pair the setup with a mod such as TrueUUID.
Singleplayer / LAN Hosting
When opening a singleplayer world to LAN, ZstdNet adds a Zstd port field to the Open to LAN screen and keeps the normal game port field compatible with vanilla or supported advanced LAN screens.
Recommended usage:
- Leave the game port empty unless you explicitly need a fixed Minecraft LAN port. ZstdNet follows the actual LAN port used by the current session.
- The Zstd port uses the configured port first. If that port is already occupied or reserved by the LAN session or voice route, ZstdNet automatically falls back to another available port.
- After the LAN world is opened, in-game chat prints the actual Zstd port. The Zstd port in that message can be clicked to copy it.
The active settings are stored in:
config/zstdnet-server.propertiesand support hot reload.
If friends are joining from outside your local network, give them this address:
Your public IP or domain:actual Zstd port shown in chatExamples:
mc.example.com:35565
203.0.113.10:35565
If another LAN mod fully replaces the Open to LAN screen and the Zstd field is not visible, use:
/zstdport showto view the current ports. Use:
/zstdport zstd <port>only when you need to pin a fixed public or tunnel port.
Commands
/zstdhud
Used to check or toggle the HUD:
/zstdhud
/zstdhud on
/zstdhud off
/zstdhud toggle
/zstdport
Used to view or change ports in singleplayer / LAN hosting scenarios:
/zstdport show
/zstdport game 25565
/zstdport zstd 35565
/zstdport voice 25565
/zstdport zstdvoice 24455
Notes:
/zstdportis a client-side command.showdisplays the current effective config.gamechanges the preferred backend game port.zstdchanges the preferred Zstd listen port.voicechangesvoice_chat_target, the backend voice port.zstdvoicechangesvoice_chat_listen, the public voice entry.- In normal LAN hosting, you usually do not need to run these commands manually.
- For dedicated servers, edit
config/zstdnet-server.propertiesdirectly.
HUD Panel
After enabling the HUD, you can view:
- Current connection mode
- Listen address or remote target address
- Compressed real-time throughput
- Raw real-time throughput
- Total transferred traffic
- Compression ratio
- Current connection count
The HUD is the easiest way to confirm whether the connection is actually using ZstdNet.
Simple Voice Chat / UDP Notes
Simple Voice Chat audio is not compressed by ZstdNet. ZstdNet forwards UDP voice packets as raw passthrough.
- If Simple Voice Chat uses its own UDP port, set
voice_chat_listenexplicitly when needed. voice_chat_targetcan usually stay blank and will default to the local voice port.- If the UDP route cannot be armed, the game TCP path still works, but voice chat may stay offline.
FAQ
Why can't I join the server?
Check these first:
- If
auto_takeover=true, players should keep using the usual public port fromserver.properties. - If
auto_takeover=false, make sure players are using the configuredlistenport. - Make sure FRP or other tunnels are forwarding to the ZstdNet
listenport. - Make sure
enabled=trueis set inconfig/zstdnet-server.properties. - Make sure
listenandtargetare not reversed in manual mode. - Make sure the Zstd port is not blocked by firewall rules or already used by another program.
- In LAN hosting, use the actual Zstd port shown in chat. The game port can usually be left empty because ZstdNet follows the current LAN session port automatically.
- Make sure no other mod is intercepting the login or handshake flow.
Does a ratio near 100% mean it is not working?
Not necessarily. Some traffic does not compress well, or may already be encrypted, which reduces the benefit.
Can this conflict with other multiplayer mods?
Possibly. ZstdNet is designed to be compatible with vanilla and common LAN screen patterns, but UI-heavy menu rewrites can still require command fallback through /zstdport show or /zstdport zstd <port>.
Configuration Files
- Client:
config/zstdnet-client.toml - Server:
config/zstdnet-server.properties
zstdnet-server.properties is auto-maintained. When ports are changed by commands or auto takeover, the file is rewritten with the built-in commented template.
Important server options:
enabled: enable or disable ZstdNet service.auto_takeover: automatically useserver-portfromserver.propertiesas the public entry on dedicated servers.listen: Zstd compressed entry address and port in manual mode.target: backend Minecraft server address and port in manual mode.level: compression strength, range 1-22.voice_chat_passthrough: enable raw UDP passthrough for voice chat.voice_chat_listen: optional public UDP entry for voice chat.voice_chat_target: optional backend UDP target for voice chat.
Client config:
[general]
level = 3
level controls the client-to-server Zstd compression level. Higher levels may compress better but use more CPU. A value around 3-5 is usually a good balance.
Dependency
- zstd-jni
License
MIT License
- Edition: Minecraft Java
- File type: .jar
- Minecraft versions listed: 1.20.1, 1.21.1
- How to install: Install the matching mod loader (Forge, Fabric or NeoForge) for your Minecraft version. → Download the .jar. → Put it in the .minecraft/mods folder and launch that loader profile.
- Where to get it: Opens on CurseForge — not every file is mirrored on our own servers.
Install steps are the general flow for this file type — How to install Minecraft Java mods & modpacks walks through it step by step.
- Ships as zstdnet-1.20.1-forge-1.4.7.jar — drop this file into the mods folder
- Download size: 8.3 MB
- Download link checked 3 Oct 2026 — working
These come from our own check of the pack file, not from the source page.