Neo's Meshes
Java mod listed for Minecraft 26.x. Downloads from the MC Java Mods app on Android.
A Mod that adds a few tools that let you create meshes using vertices and faces, then give faces collisions and textures.
⬇ Download on ModrinthNeo's Meshes - Complete Feature Guide
Neo's Meshes is a Fabric mod for Minecraft Java Edition 26.1.2 that lets players construct persistent, textured, collidable 3D polygon meshes directly inside a world.
It can also import complete glTF 2.0 .glb and .gltf models in-game, preserve their UV-mapped base-color textures in a generated required resource pack, turn the result into a reusable Saved Mesh Template, and register the same exact triangle mesh as a command-selectable Minecraft item model.
Normal Creation Workflow
- Place vertices with the Vertex Tool.
- Select those vertices in boundary order with the Face Tool.
- Middle-click to turn the selection into a face on the mesh.
- Pick a resource-pack texture (added or vanilla) with the Render Tool.
- Apply that texture to the face or entire mesh.
- Enable collision with the Collision Tool.
- Optionally configure the collision behavior.
- Optionally capture the finished mesh as a reusable template.
Meshes are stored independently per dimension and remain after saving and reopening the world.
Included Items and Controls
| Item | Controls and behavior |
|---|---|
VertexTool |
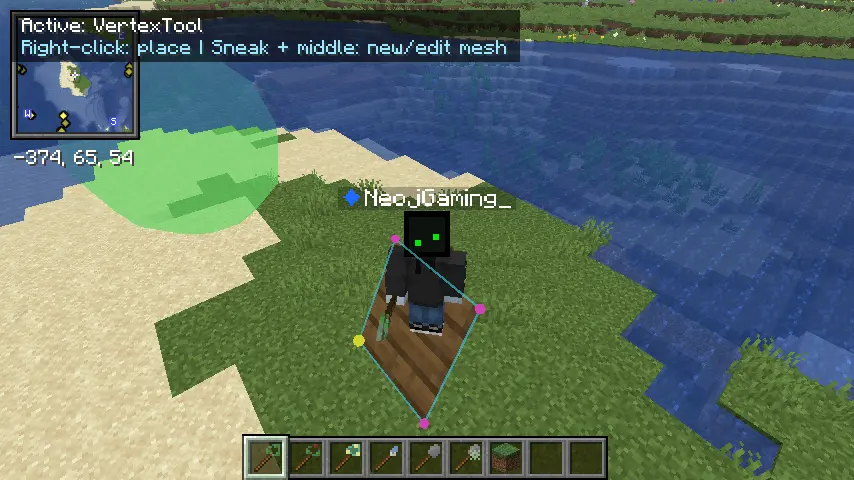
Shows a live green placement preview. Right-click places a vertex. Sneak + middle-click selects the mesh belonging to the face or vertex you are looking at, or finishes the current mesh and creates a separate empty one when neither is targeted. |
Mesh Delete Tool |
Right-click a targeted vertex to remove that vertex and its dependent topology, or right-click a face to remove that complete polygon while keeping its other vertices. Crouch + left-click any face or vertex to permanently delete its entire mesh. |
FaceTool |
Right-click vertices in boundary order to select them. Left-click a selected vertex to deselect it. Middle-click with at least three selected vertices to create the face. Sneak + double-left-click a face to delete a face while keeping its vertices. |
RenderTool |
Middle-click, or right-click empty space, opens the texture browser. Right-click a face to apply the selected texture. Sneak + right-click applies it to every face in that mesh. |
CollisionTool |
Left-click a face to enable collision. Right-click removes that face's collision. Sneak + left-click a mesh face or vertex to enable collision for every face in that mesh. |
Collision Settings Tool |
Right-click a face to configure stair-like or slippery slopes or ice mode, with a friction slider, if the face is perfectly flat. Settings can be applied to one face or the whole mesh. |
Mesh Template |
Right-click while looking at a mesh face or vertex to capture the entire mesh. A targeted vertex becomes the origin; a targeted face uses the exact point clicked on its surface. |
Saved Mesh Template |
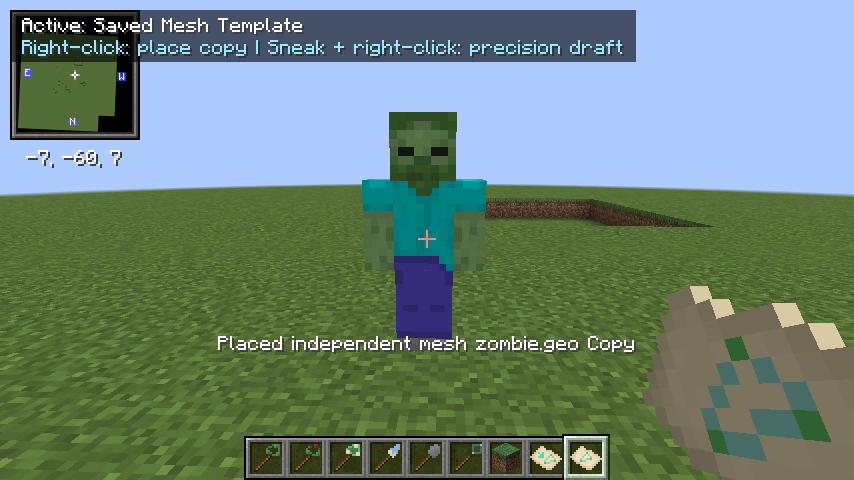
The distinct item produced after capture. Right-click places a copy; sneak + right-click opens precision draft placement. |
Model Import Tool |
Right-click to open a responsive file-import screen. Browse for a glTF 2.0 .glb or .gltf, inspect its vertex/triangle/texture summary, and create both a Saved Mesh Template and an nmesh:<filename> item model containing the transformed full model. |
Selection Tool |
Right-click twice to place two temporary fill-style selection corners using the Vertex Tool placement rules. Middle-click after both corners exist to open bulk actions for enclosed vertices and faces. |
The creative tab exposes all editing tools, the blank Mesh Template, and the Model Import Tool. Saved Mesh Templates are produced through capture or model import rather than directly listed.
Every item stacks to one and has no durability system.
Vertex Placement and Mesh Selection
Normal vertex placement is centered three blocks along the camera direction.
When not crouching:
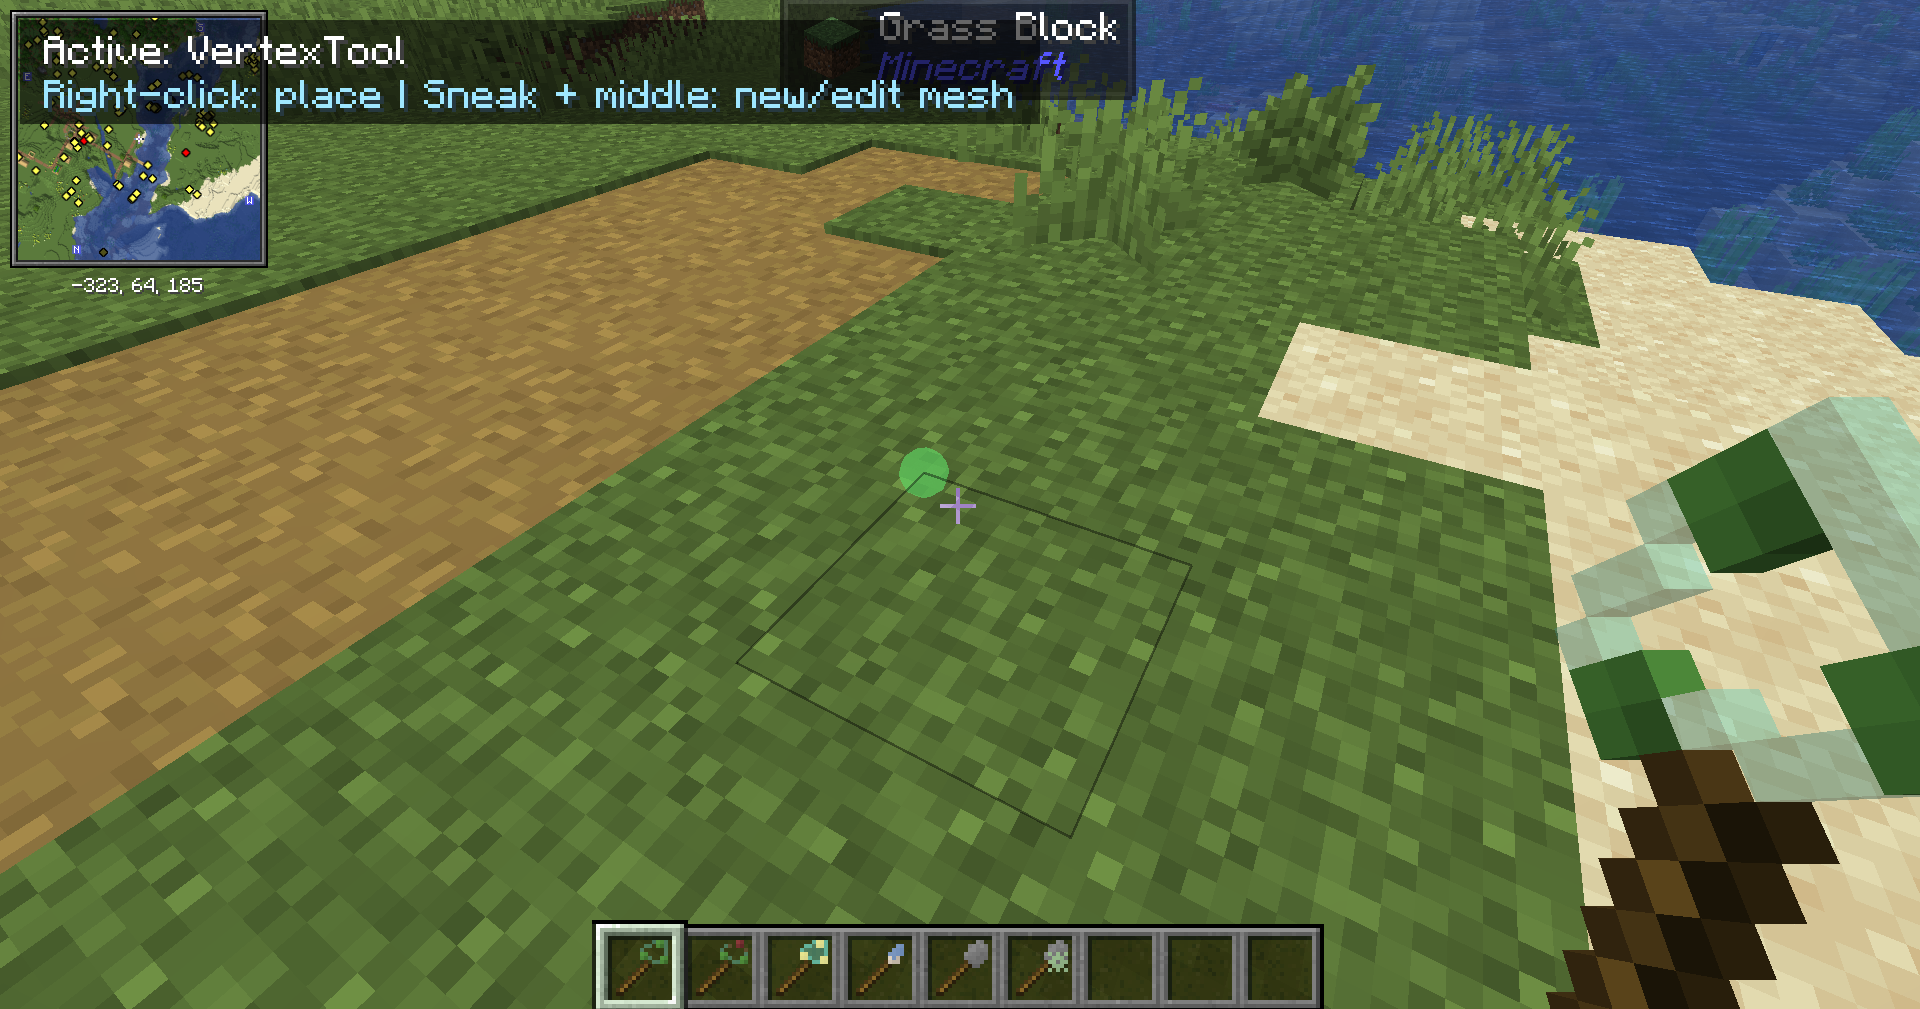
- If a reachable block is under the crosshair, placement moves onto the actual outline face of that block.
- It selects the closest point from a 3x3 anchor grid on that face: four corners, four edge midpoints, and the face center.
- Exact block outlines are honored, including partial shapes such as slabs.
- A closer block causes the vertex to rest on that block rather than staying three blocks away.
- If no block is hit, the three-block endpoint snaps to the center of its containing block space.
When crouching:
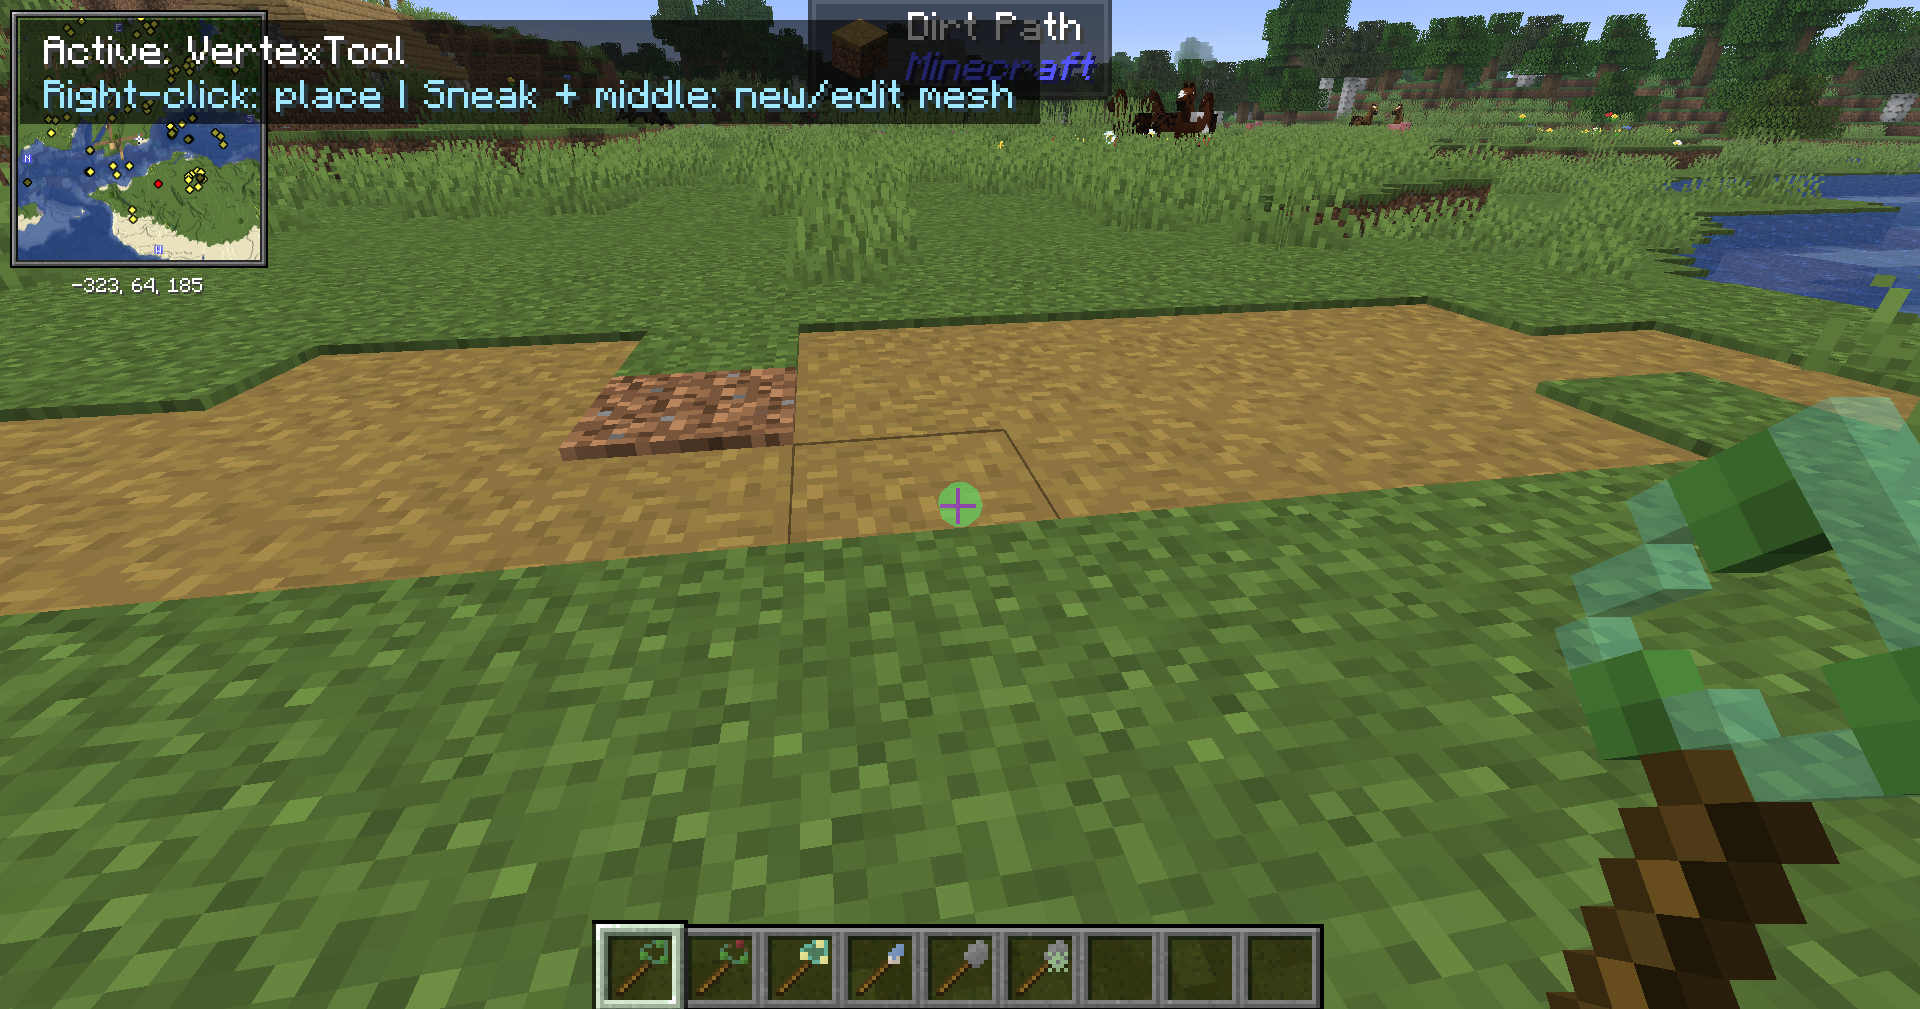
- Placement is exactly three blocks along the camera direction.
- No block, grid, or block-center snapping is applied.
The client preview and server placement use the same calculation.
The first vertex creates and selects a mesh automatically if one is not already selected. Mesh selection is based on the face or vertex under the camera ray, not whether the placement preview overlaps it. Looking at a face or vertex and using sneak + middle-click switches editing to that part's mesh and clears any face selection from another mesh.
Selection Tool and Fill-Style Area Actions
The Selection Tool provides a temporary, per-player rectangular editing volume for mass-editing meshes.
- Right-click places the first corner.
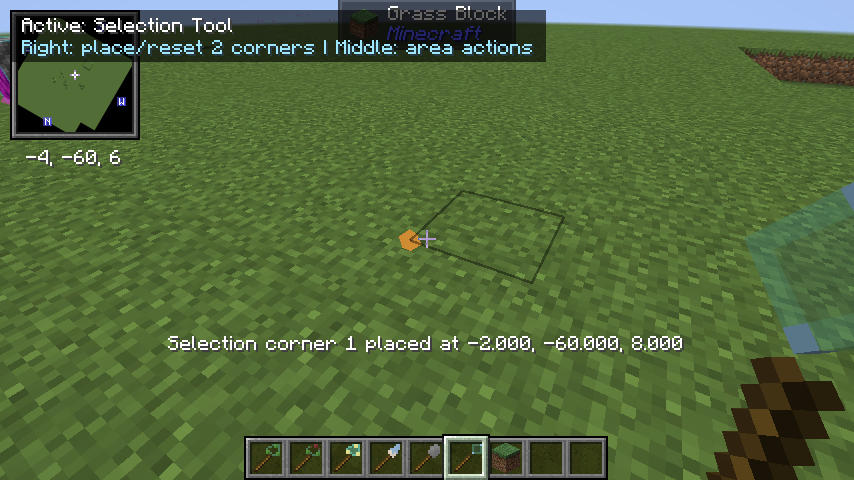
- Right-click again places the second corner and completes the box.
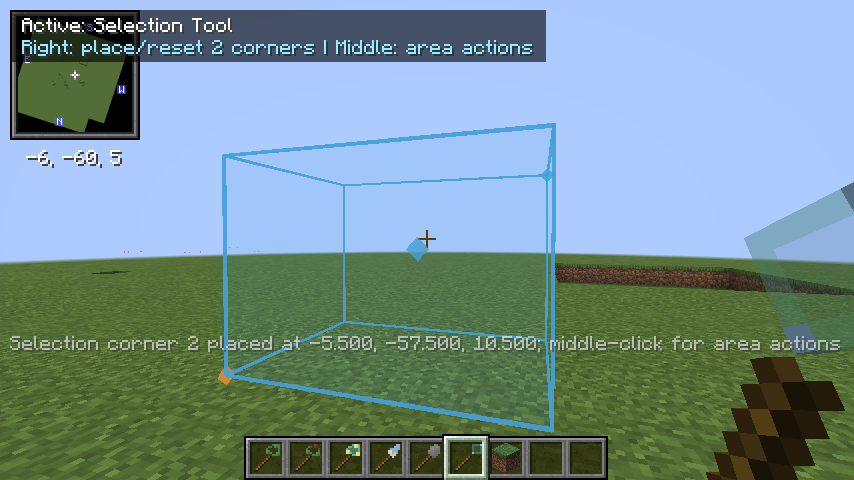
- A third right-click replaces the previous box and becomes corner one of a new selection.
- Both corners use the same three-block reach, crouching behavior, block-face placement, and 3x3 face-anchor snapping as the Vertex Tool.
- A blue placement preview shows where the next corner will land.
- The first and second corners appear as differently colored markers.
- Middle-click opens the responsive area-action menu.
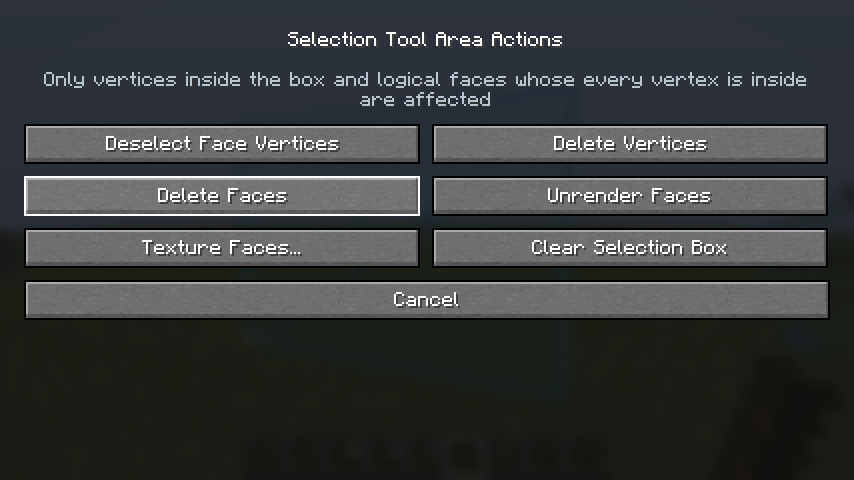
The available actions are:
- Deselect Face Vertices: removes enclosed vertices from the current Face Tool boundary selection without deleting them.
- Delete Vertices: deletes every actual mesh vertex inside the box across every mesh in the dimension. Faces and edges that depend on a deleted vertex are removed safely, and other players' editor indices are remapped.
- Delete Faces: deletes every fully enclosed logical polygon while preserving its remaining vertices.
- Unrender Faces: makes every fully enclosed logical polygon invisible while preserving its texture assignment, collision, vertices, and topology.
- Texture Faces: opens the normal searchable texture browser, then applies the chosen texture to every fully enclosed logical polygon. Applying a texture also renders that face.
- Clear Selection Box: removes both fake corners and the box without changing any mesh.
Selection boundaries are inclusive. A logical face is considered enclosed only when every vertex belonging to all of its internal triangles is inside the box. A face that merely crosses the box boundary is therefore not unexpectedly deleted, unrendered, or retextured. Triangulated quads and larger polygons remain one atomic logical face during these operations.
Polygon Faces
Face vertices must be selected in the intended boundary order. The tool does not automatically finish after three vertices; you may select up to 256 vertices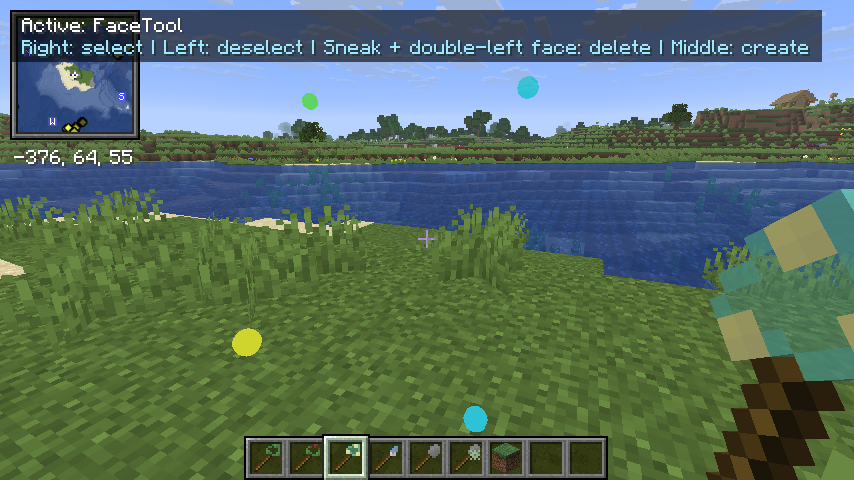
and then explicitly middle-click.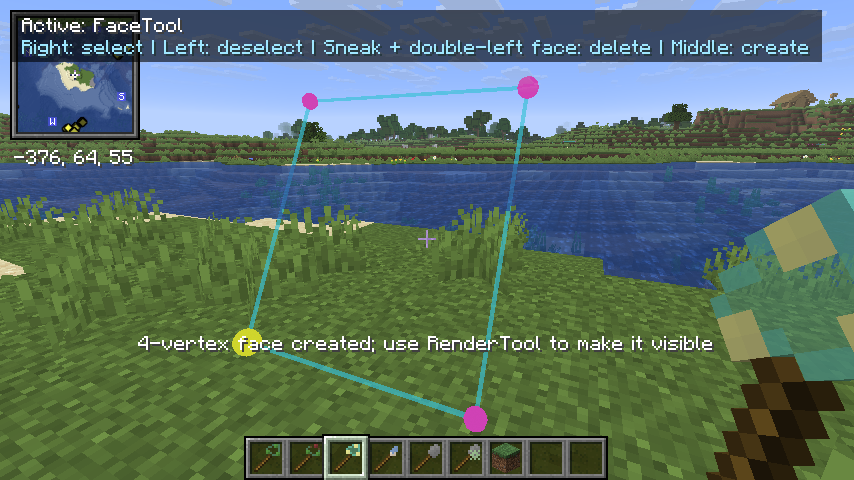
The polygon system supports triangles, quads, larger polygons, and valid concave polygons. Internally, polygons are ear-clipped into triangles, but all triangles share one face-group identity. Consequently:
- One texture operation affects the entire polygon.
- One collision operation affects the entire polygon.
- Deleting any part removes the complete logical polygon.
- Internal triangulation edges are not treated as separate collision borders.
- Texture coordinates remain continuous between the internal triangles.
A new face begins as topology only: it is neither rendered nor collidable until the corresponding tools are used.
A mesh supports up to 16,384 vertices and 32,768 internal face triangles.
Mesh and Part Deletion
- Right-click a vertex to delete that vertex. Any faces and edges that require it are removed safely.
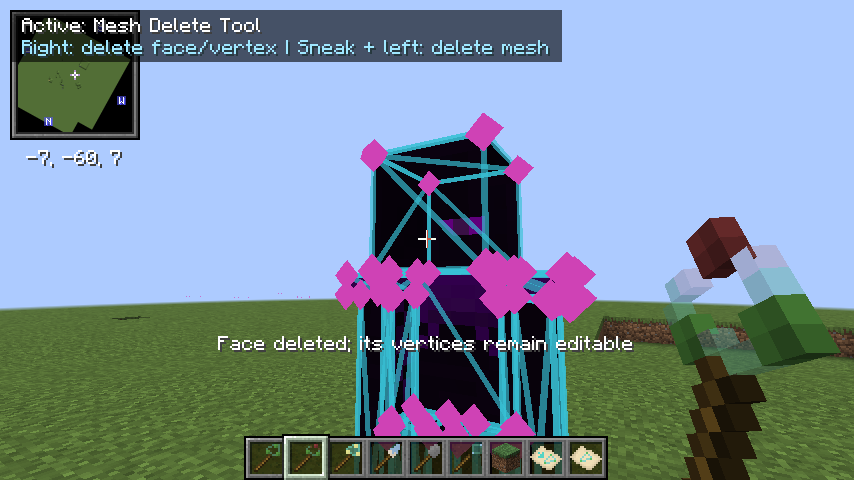
- Right-click a face to delete the complete logical polygon face, including all of its internal triangles, texture, collision, and collision settings. Vertices not removed by the operation remain available for editing.
- Crouch + left-click any vertex or face to delete the entire mesh containing it.
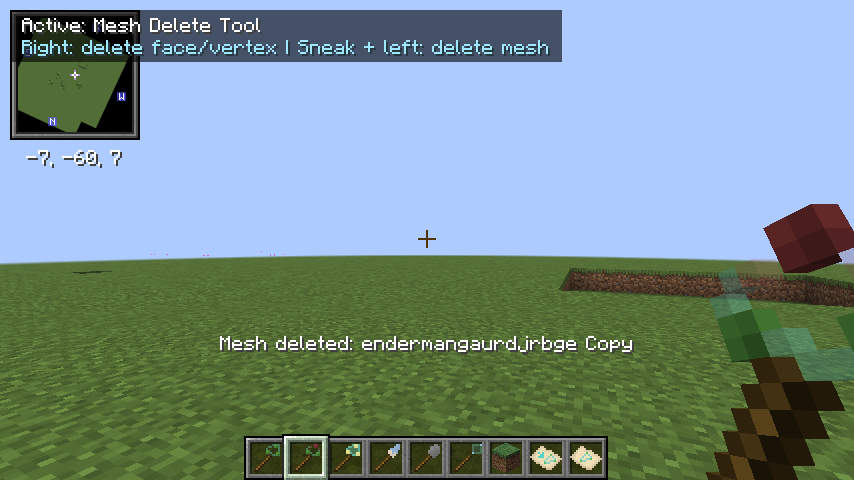
Whole-mesh deletion removes all of the mesh's vertices, faces, rendered geometry, collision geometry, saved world data, and active editor selection. The removal is synchronized immediately to every player in that dimension.
Texture System
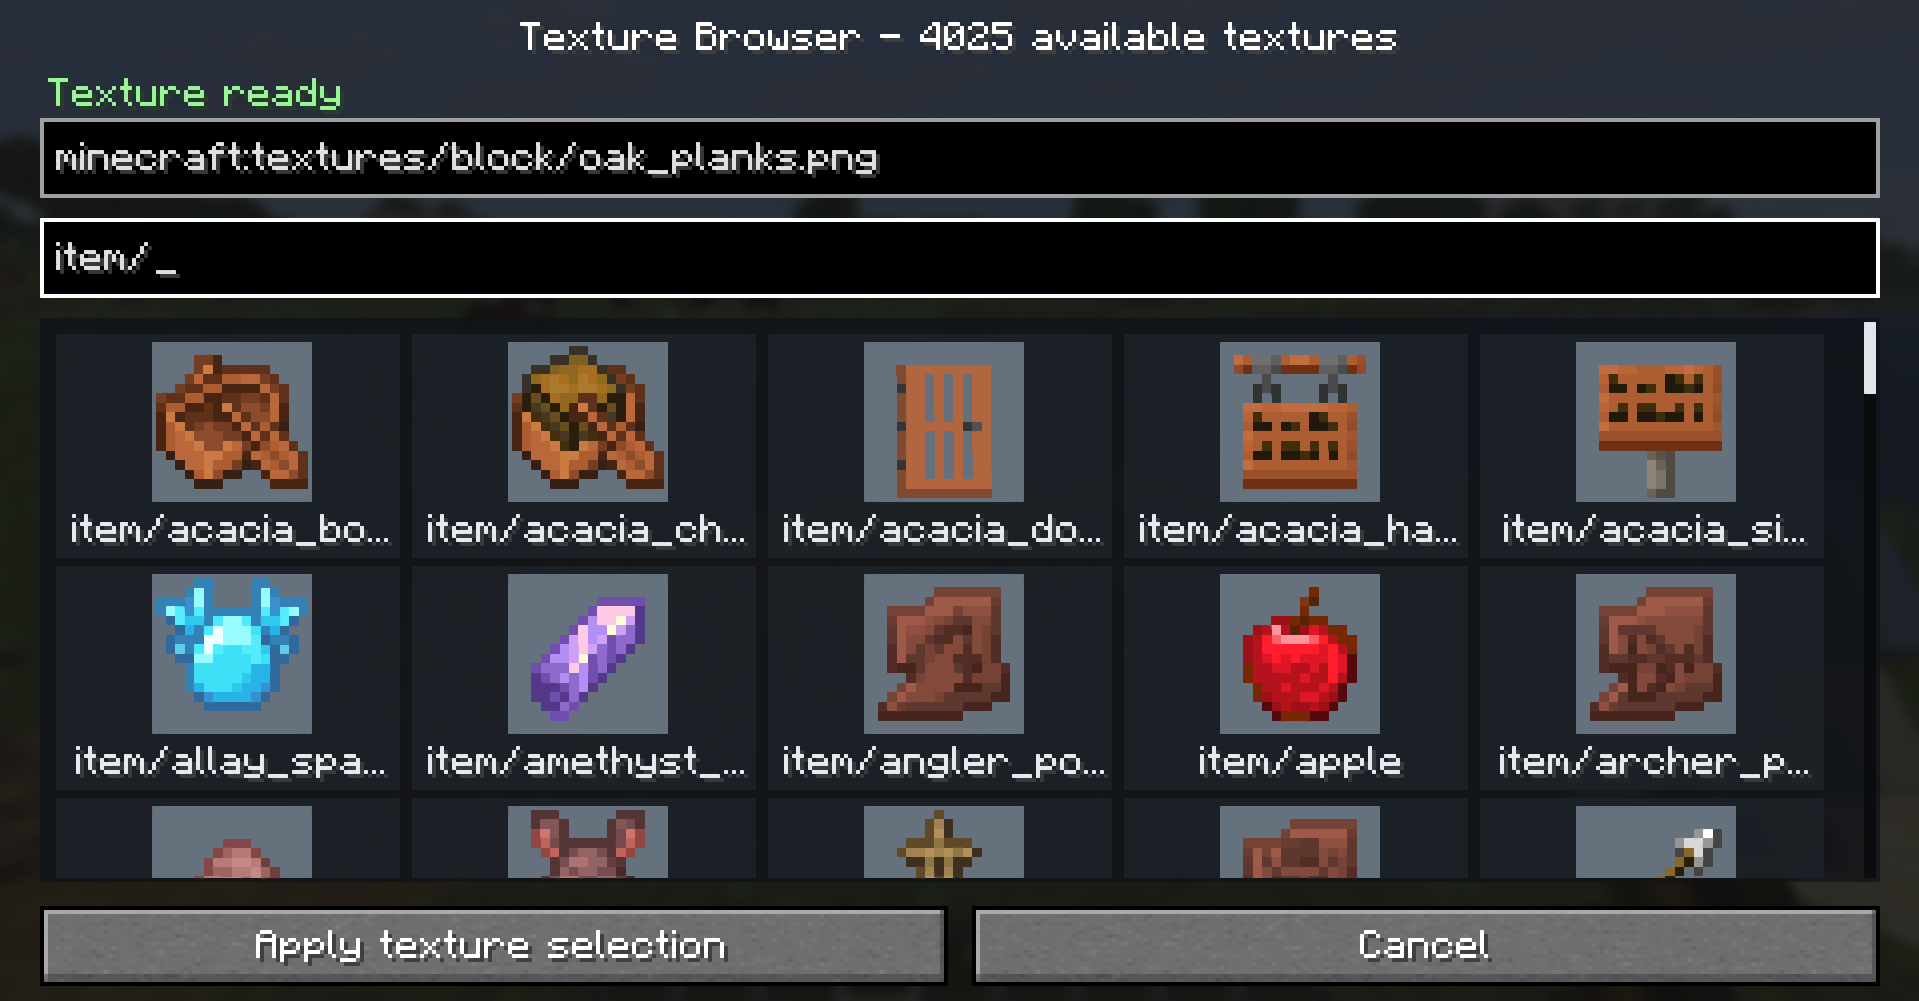
The RenderTool opens a responsive, searchable, scrollable texture browser. It enumerates effective PNG resources under textures/ from:
- Vanilla's resources.
- Enabled resource packs.
- Mod resources, including textures added under
assets/nmesh/textures/.
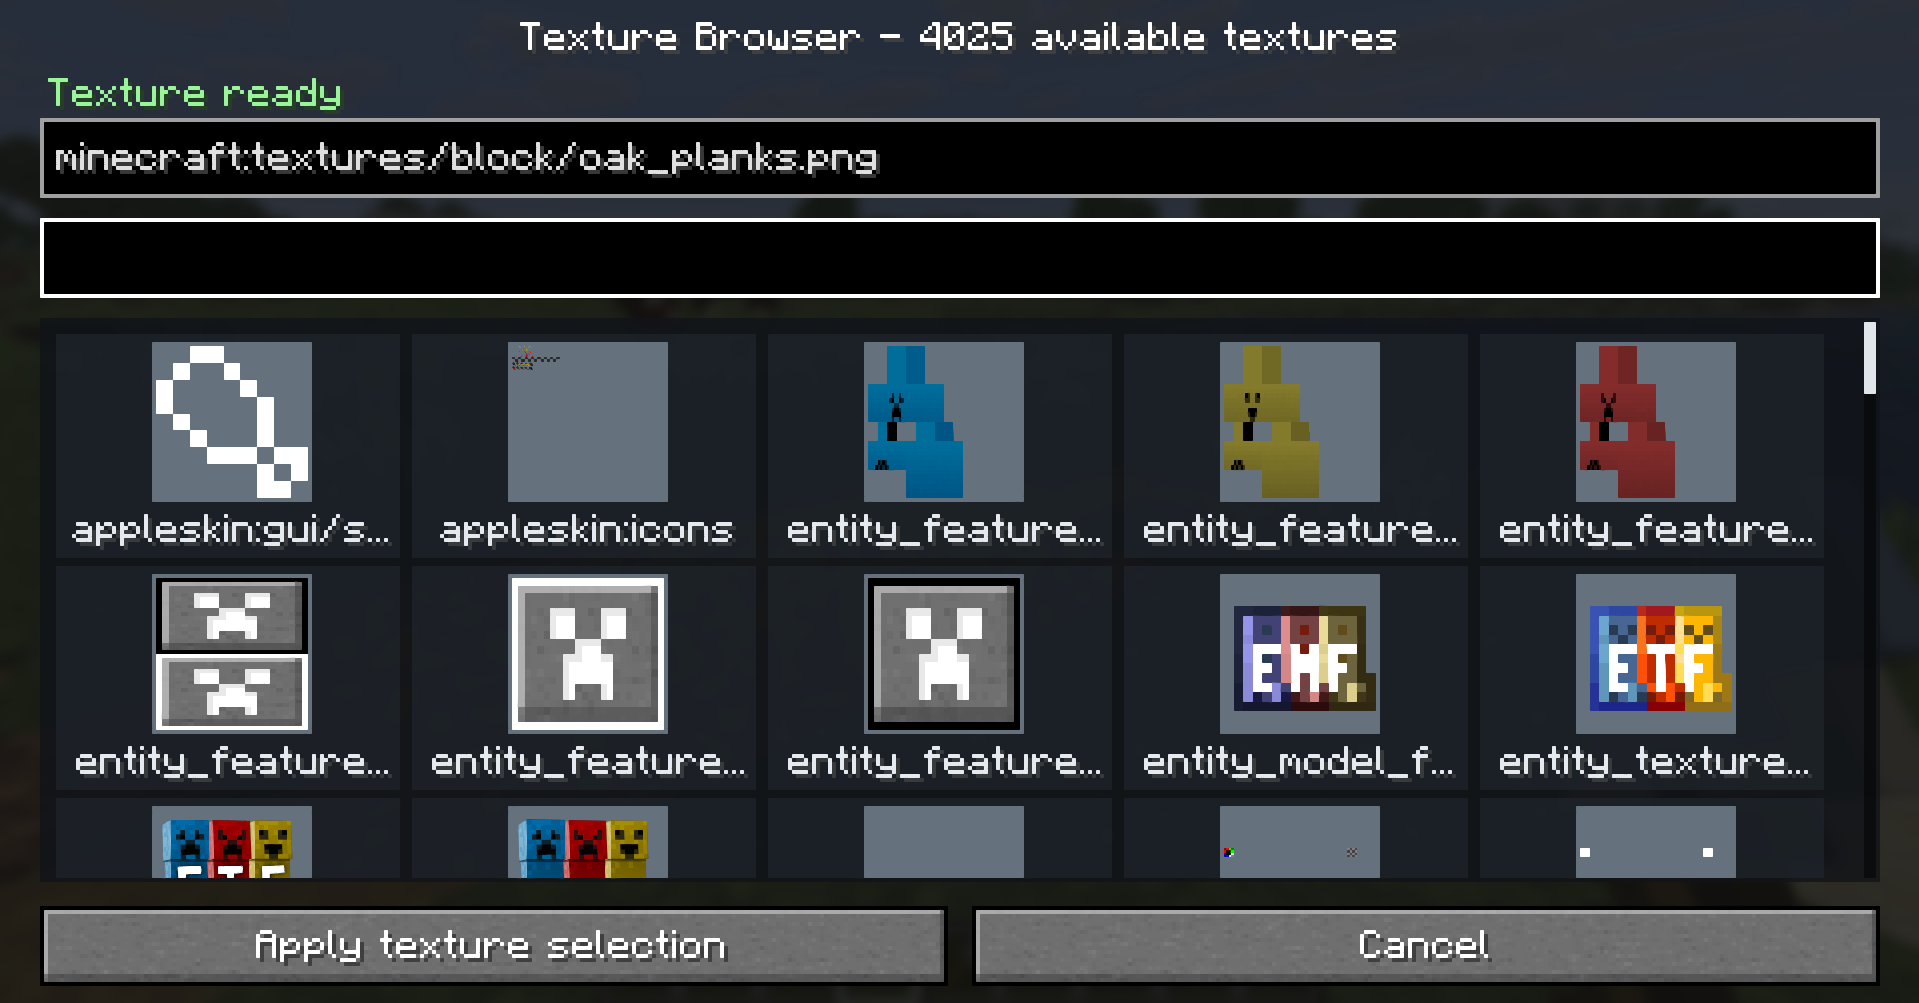
Each texture has a preview and full resource identifier tooltip. A resource identifier can also be entered manually, such as:
minecraft:block/oak_planks
minecraft:textures/block/oak_planks.png
nmesh:item/example
Identifiers are normalized to their actual texture resource path. Missing textures make the field red and disable the Apply button. If an already-saved texture later disappears, rendering falls back to oak planks instead of making the mesh vanish.
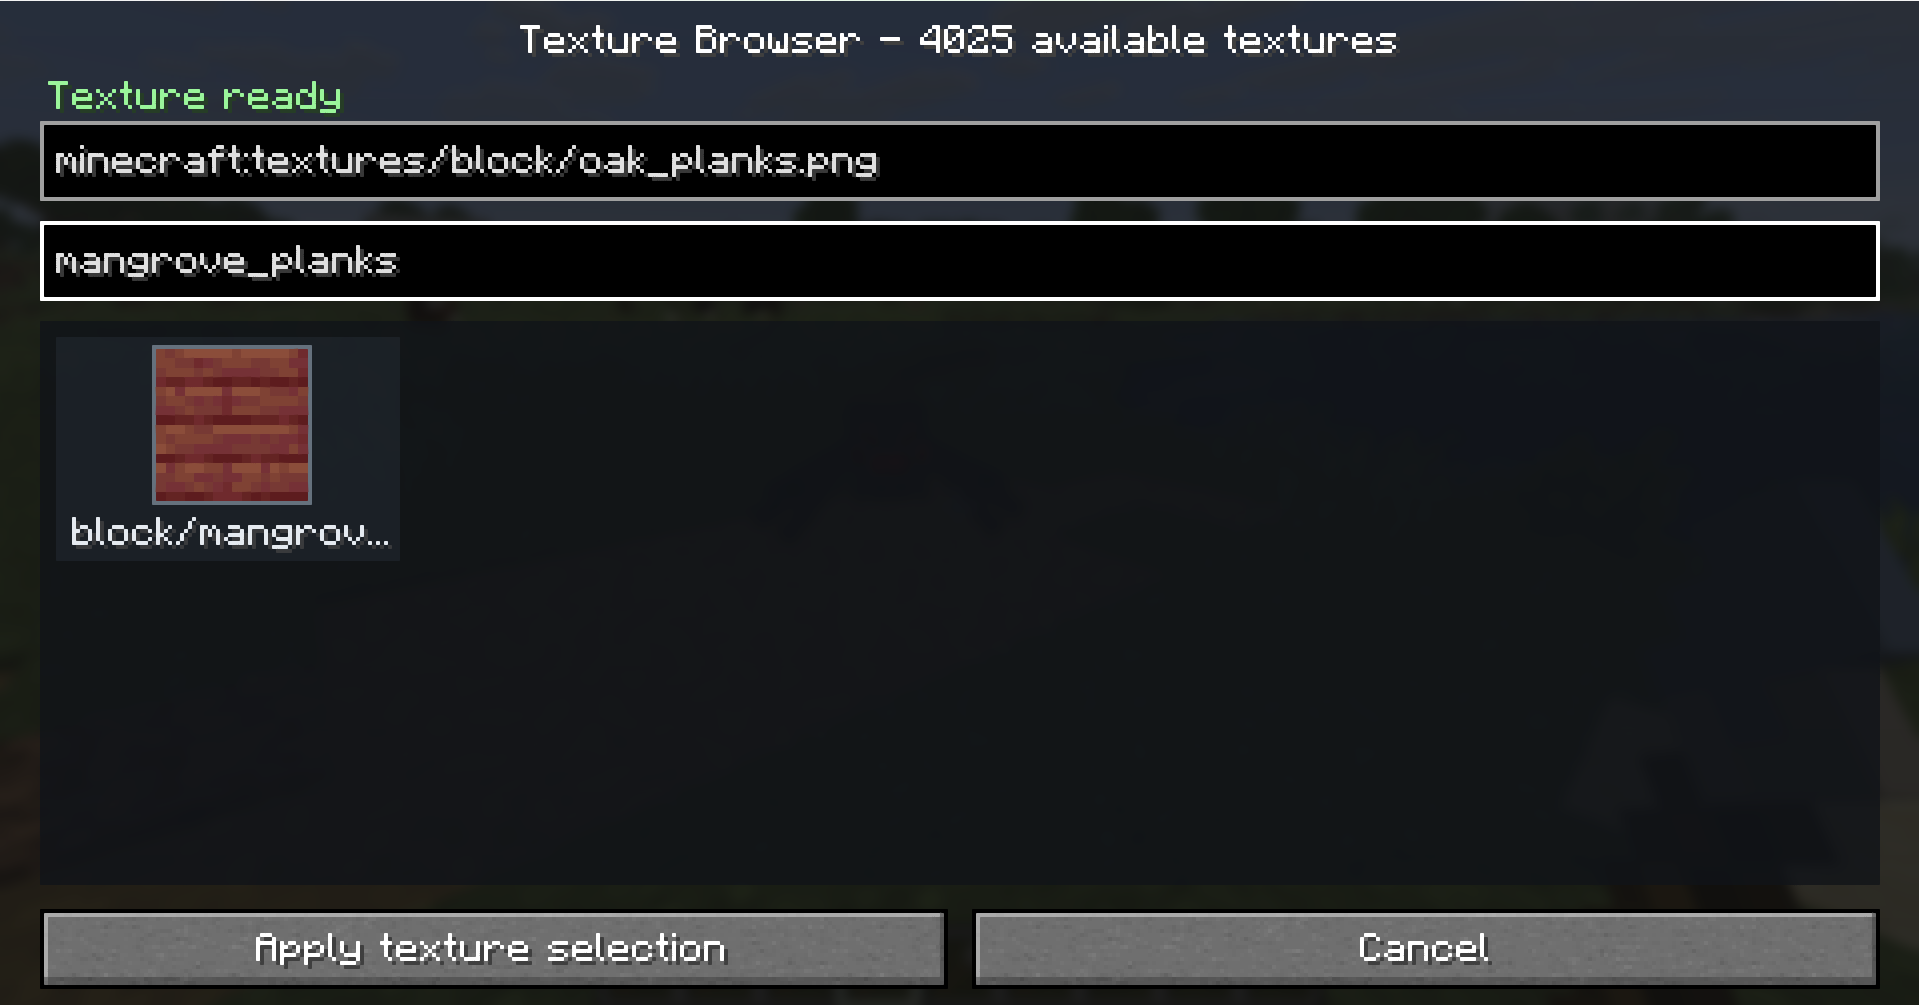
Applying a texture:
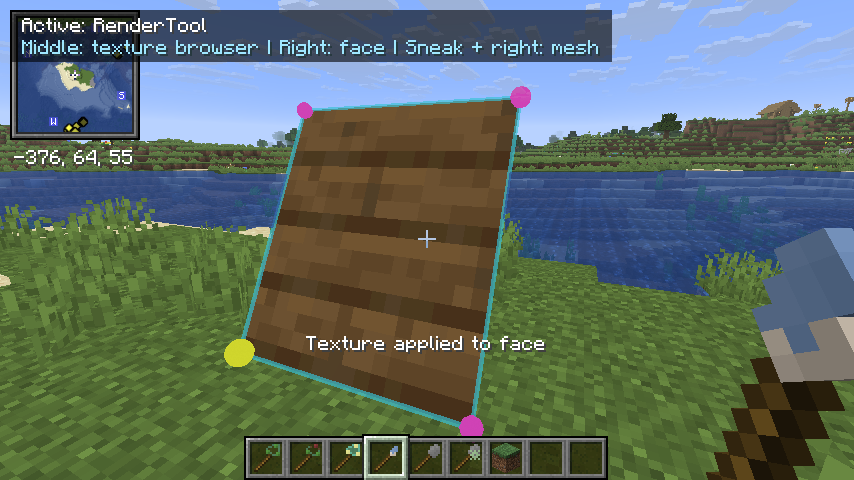
- Marks the face as rendered.
- Stores the texture independently on that face group.
- Projects the complete polygon into 2D.
- Normalizes the polygon's bounds to the full 0-1 UV range.
- Stretches one fitted copy of the texture across the whole polygon.
- Preserves consistent UV coordinates across all internal triangles.
Each triangle is submitted separately as a degenerate quad so Minecraft cannot accidentally connect neighboring triangles into long, distorted texture wedges.
Fresh meshes render white, opaque, double-sided, and with normal world lighting. Coplanar mesh surfaces use a forward depth layer, so the mesh takes visual precedence over a block when they are exactly flush, avoiding z-fighting.
Meshes are not Minecraft entities. They are custom world geometry submitted through Fabric's world-rendering phase. The implementation borrows Minecraft's entity cutout/translucent pipelines for material rendering, but samples surrounding world-surface light so a mesh intersecting a block does not become dark like an entity inside that block.
Editor Visualization
While an editing tool is held:
- Vertices appear as glowing 3D spheres visible through blocks.
- Selected mesh edges are brighter cyan.
- Selected-mesh vertices are magenta.
- The currently selected vertex is yellow and larger.
- The first vertex of a face draft is green.
- Other face-draft vertices are cyan.
- The face under the crosshair is highlighted yellow.
- Unrendered faces have a faint blue editor preview.
- Collidable faces appear red while holding the CollisionTool.
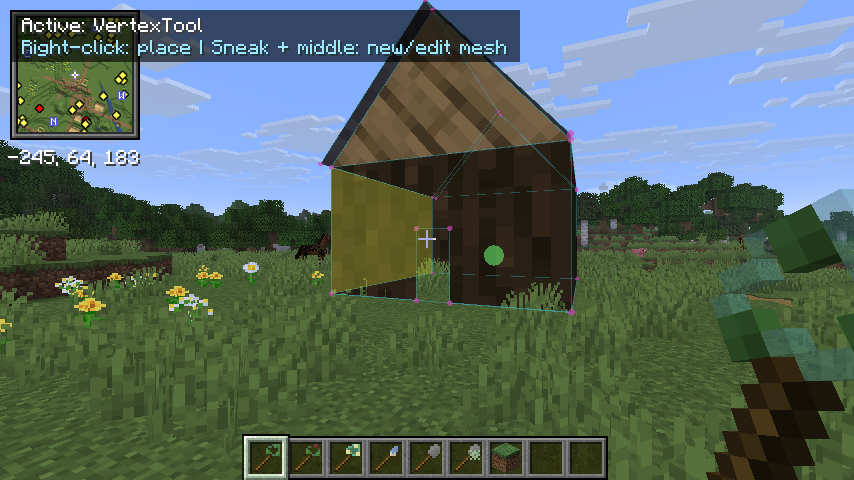
These markers are editing aids only and are not stored as part of the finished appearance.
Vertex markers use lightweight eight-triangle octahedra instead of high-segment spheres. Authored editor edges use a two-triangle camera-facing ribbon instead of a twelve-triangle solid prism. This reduces marker geometry by 92% and edge geometry by about 83% while keeping the same colors, through-wall visibility, target highlighting, and normal/detail sizes. Textured mesh face geometry remains revision-cached and is not rebuilt unless that mesh changes.
For dense or imported models, hold F1 to momentarily switch the editor aids into high-detail view. In this view, vertex markers become much smaller and authored mesh edges are hidden so the textured model is easier to inspect. Releasing F1 restores the current persistent view state. Press F4 once to keep high-detail view enabled, and press F4 again to return to the normal marker and edge sizes. Selection-box boundaries remain visible because they describe the active editing area rather than mesh topology.
A compact top-left HUD shows the controls for the held tool. Precision template draft mode intentionally has no HUD overlay, screen, or world darkening.
Exact Collision System
Collision is independent of rendering. A face may be visible without collision, collidable without a texture, both, or neither.
Enabled polygons are not converted into blocks or stair-stepped voxel boxes. The mod continuously sweeps an entity's real bounding box against the authored triangle planes and polygon boundaries.
The solver includes:
- Continuous collision detection to reduce high-speed tunneling.
- Exact triangle planes and polygon boundaries.
- Seamless movement across triangles belonging to the same polygon.
- No invisible walls along internal triangulation diagonals.
- Flush block-to-mesh and mesh-to-block transitions.
- Movement projection along sloped surfaces.
- Spatial section indexing so only nearby collision triangles are checked.
- Collision integration before and after vanilla's block collision resolution.
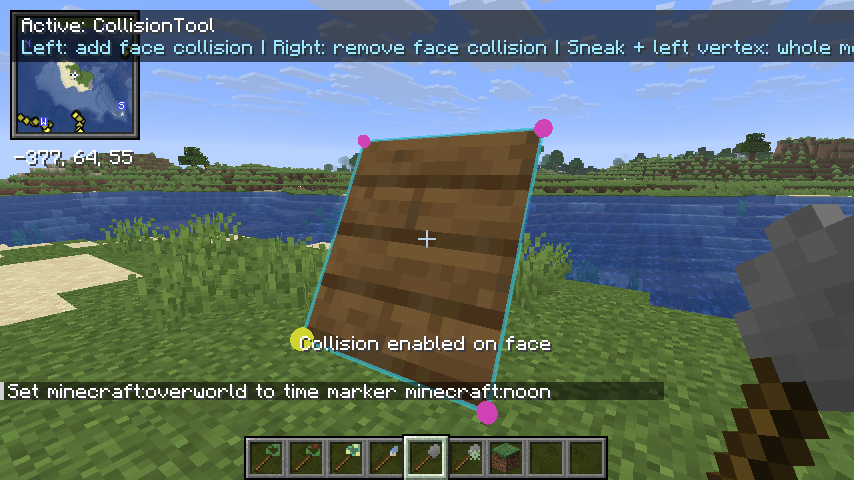
The collision boundary is intentionally inset by at most 0.001 blocks around a polygon's outer edge. This tiny reduction prevents a vertical face underneath or beside a floor from catching an entity trying to walk off the floor. Internal triangle seams are not inset.
Because the collision mixin applies to Minecraft's base Entity collision method, mesh collision can affect players and other entities using normal movement collision.
Collision Movement Settings
The Collision Settings Tool provides:
- Stair-like slopes.
- Slippery slopes.
- Flat ice mode.
- Slipperiness from
0.00to1.00. - Apply to Face.
- Apply to Mesh.
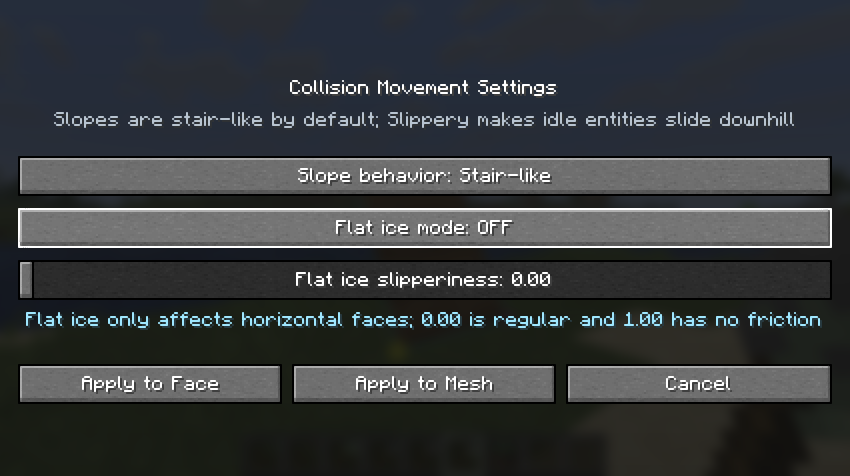
Stair-like is the default slope mode. It preserves requested horizontal travel and calculates the necessary vertical movement along the slope. Gravity by itself does not make an idle entity slide.
Slippery mode allows gravity to project along a non-horizontal slope, causing the entity to slide downhill. The direction and rate naturally depend on the face's steepness. This setting does nothing to a perfectly horizontal face.
Flat ice mode only affects horizontal collision faces. It blends the entity's requested direction with its previous horizontal movement:
0.00behaves normally.- Intermediate values preserve progressively more momentum.
1.00completely preserves the previous horizontal direction, preventing ordinary ground steering until movement is changed through another mechanism such as jumping.
glTF and GLB Model Import
Right-clicking the Model Import Tool opens an in-game import screen with both an editable file-path field and a native Browse dialog filtered to .glb and .gltf files. Reading and validating the model happens away from the render thread so a larger model does not freeze the interface while it is parsed.
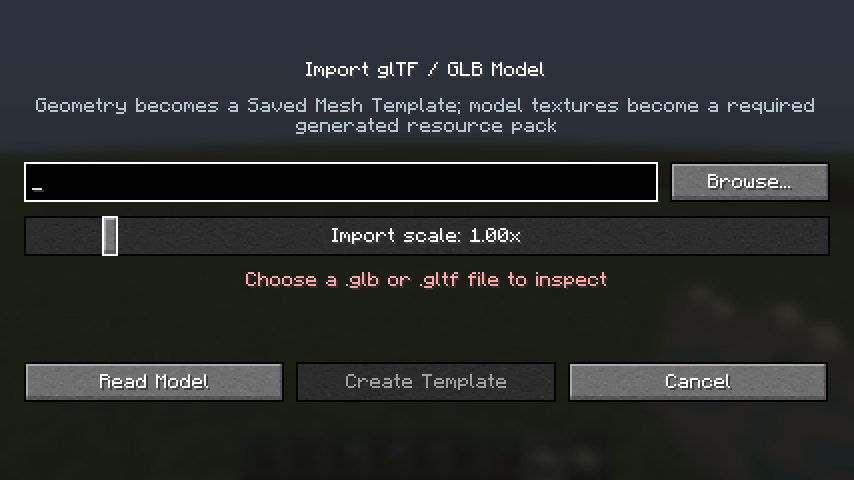
The importer includes a uniform Import scale slider. It defaults to 1.00x, ranges from 0.01x to 10.00x, and is quantized in exact 0.01x increments. The selected multiplier affects both the Saved Mesh Template's world-space vertices and the generated item model's rendered size. Face topology, UV coordinates, materials, and embedded textures are unchanged, so a very small model can be enlarged without altering its texture mapping.
The importer supports glTF 2.0 features needed for ordinary authored mesh models:
- Text
.gltffiles and binary.glbversion 2 files. - Embedded GLB binary chunks, base64/percent-encoded data URIs, and same-folder relative sidecar buffers or images.
- The selected scene, node hierarchy, repeated mesh instances, 4x4 node matrices, and translation/rotation/scale transforms.
- Indexed or unindexed triangle lists, triangle strips, and triangle fans.
- Floating-point positions and floating-point or normalized integer texture coordinates.
- Any material UV set selected through
texCoord. KHR_texture_transformoffset, scale, rotation, and UV-set override.- PBR base-color textures and base-color factors. Color/alpha factors are baked into the generated PNG so each imported face keeps its authored appearance.
- Embedded PNG and JPEG images, which are validated and converted to PNG.
After the model summary is ready, Import Mesh sends only validated mesh/template data and converted texture assets to the server. The server independently checks every coordinate, index, UV, texture size, PNG header, image dimensions, and SHA-256 content identifier before accepting it. It then gives the player a normal Saved Mesh Template and registers the same geometry in the world's imported item-model catalog. Imported triangles start rendered with their original UVs, but collision stays disabled until the Collision Tool is used. Success is reported through the same compact actionbar summary as before; importing does not add chat messages.
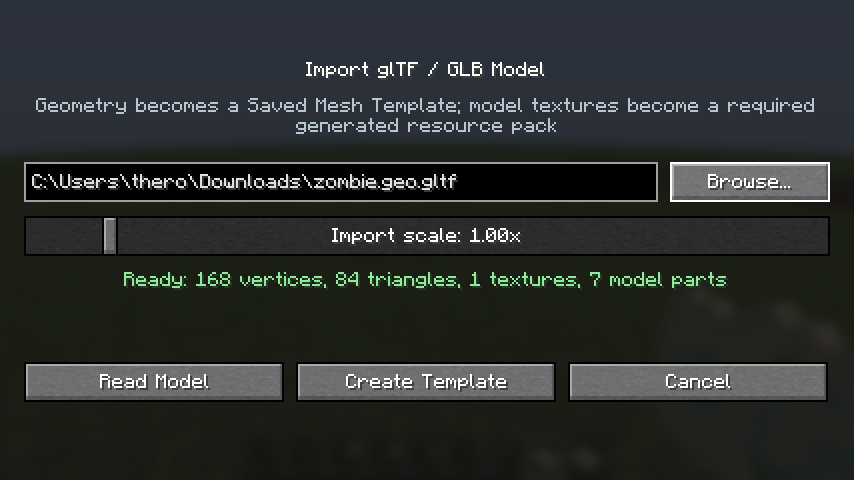
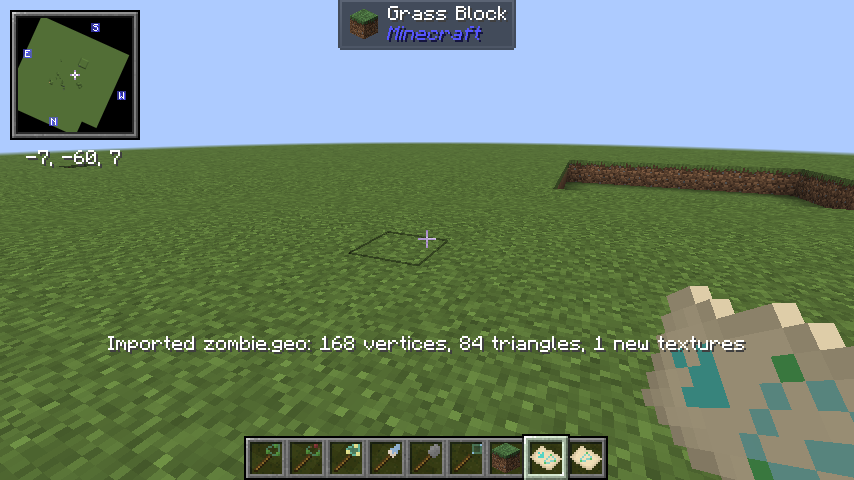
Imported model coordinates are stored relative to the glTF model origin, with one glTF unit equal to one Minecraft block. Scene and node transforms are already applied. Placing or draft-placing the resulting template therefore puts the model's authored origin on the chosen placement point.
Imported Item Models
The filename stem becomes a readable item-model identifier in the nmesh namespace. Uppercase letters become lowercase, while spaces and unsupported characters become underscores. Reimporting a file with the same normalized name updates that same ID. Names belonging to Neo's Meshes' own tool models receive a _model suffix so an import cannot replace an editor tool's appearance.
For example, importing Detailed Robot.glb registers nmesh:detailed_robot. It can be placed on any item stack with the standard Minecraft item-model component:
/give @s minecraft:zombie_spawn_egg[minecraft:item_model="nmesh:detailed_robot"]
The resulting stack draws the original imported triangles and UV-mapped textures in inventories, hands, dropped-item entities, item frames, head slots, and shelf displays. Neo's Meshes resolves the synchronized ID through Minecraft's normal minecraft:item_model lookup and submits the arbitrary triangle geometry through a special item renderer because vanilla cuboid model JSON cannot encode a general glTF mesh. At 1.00x, the full model is centered and uniformly fitted into normal item space. The selected import multiplier is then applied around that center, so 2.00x makes the item model twice as large and 0.50x makes it half-sized before the normal context-specific Minecraft item transforms are applied.
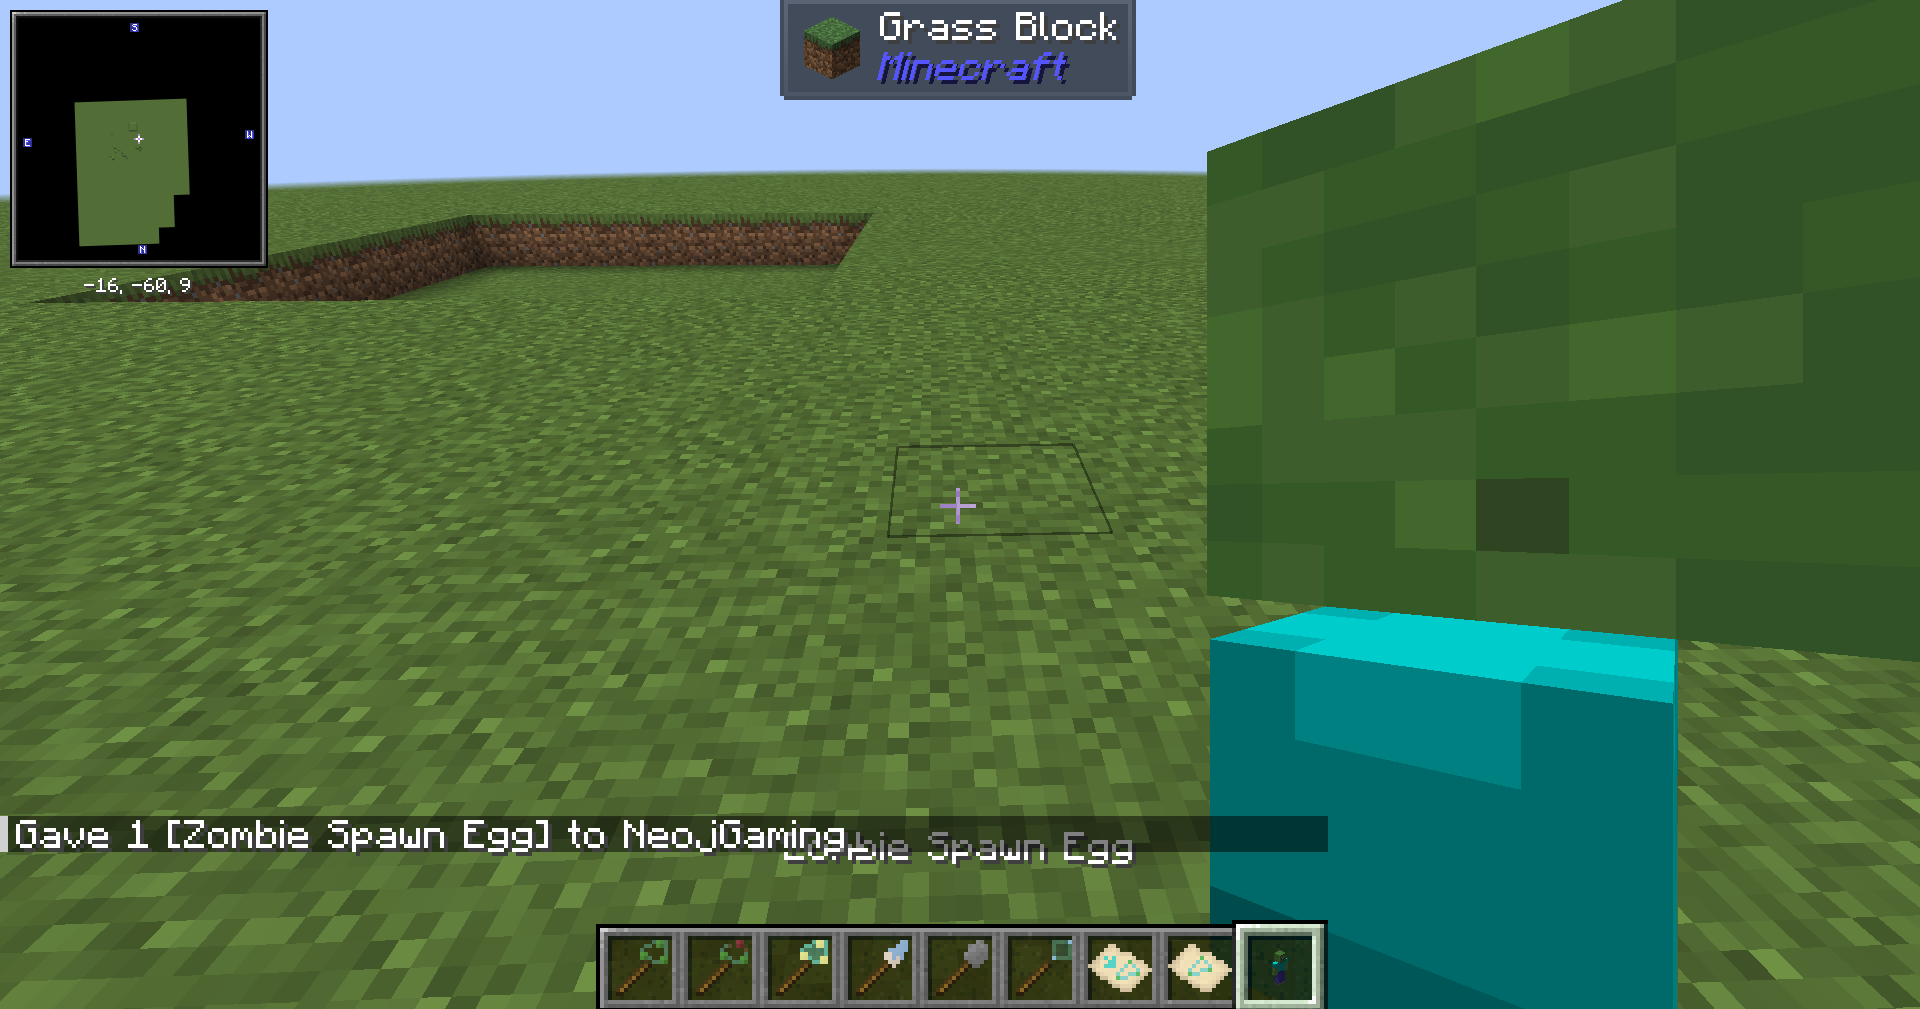
The item model contains no large custom item data: the stack stores only the ordinary small minecraft:item_model identifier. The geometry and its import-scale multiplier remain world-persistent on the server and are synchronized once as part of the imported model catalog, so any number of items can reference it without duplicating the model in NBT.
Generated Required Resource Pack
Every material image becomes an immutable resource such as:
nmesh_imported:textures/models/<sha256>.png
The SHA-256 name deduplicates identical images and prevents one import from overwriting another. These PNG bytes and the named item-model catalog are stored in the world's Neo's Meshes saved data. Joining clients receive the complete sets, and imports are broadcast to every connected player.
On the client, Neo's Meshes exposes those bytes through a real in-memory Minecraft PackResources implementation named Neo's Meshes - Imported Models. Its pack selection is always present, required, fixed, and top priority, so it is mod-side and cannot be disabled from the resource-pack menu—even when it currently contains no imported textures.
Newly synchronized PNGs are decoded and registered directly with Minecraft's texture manager. Importing a model, joining a server, or disconnecting therefore does not toggle the pack or perform a full resource-pack reload. Changed textures are replaced individually, unchanged textures are retained without another upload, and textures belonging to the previous server are released on disconnect.
Per import, source data is limited to 128 MiB, converted textures to 128 images/32 MiB, images to 4096x4096, vertices to 16,384, and triangles to 32,768. A world's synchronized generated pack is capped at 64 MiB. The item-model catalog is capped at 128 models, 131,072 total vertices, and 262,144 total triangles. Draco-compressed primitives, sparse accessors, and image encodings not decodable as PNG/JPEG are rejected with an on-screen reason instead of producing a broken template.
Mesh Templates
Using a blank Mesh Template on a targeted face or vertex captures:
- Every vertex as a position relative to the chosen origin.
- Face topology and boundary edges.
- Per-face textures and fitted UV coordinates.
- Rendered/unrendered state.
- Collision-enabled state.
- Slope and ice material settings.
- The original mesh name and retained compatibility settings.
When a vertex is targeted, that vertex becomes the template's exact origin. When a face is targeted, the precise ray-hit point on the face becomes the origin, allowing the copied mesh to be placed using an anchor anywhere on that surface.
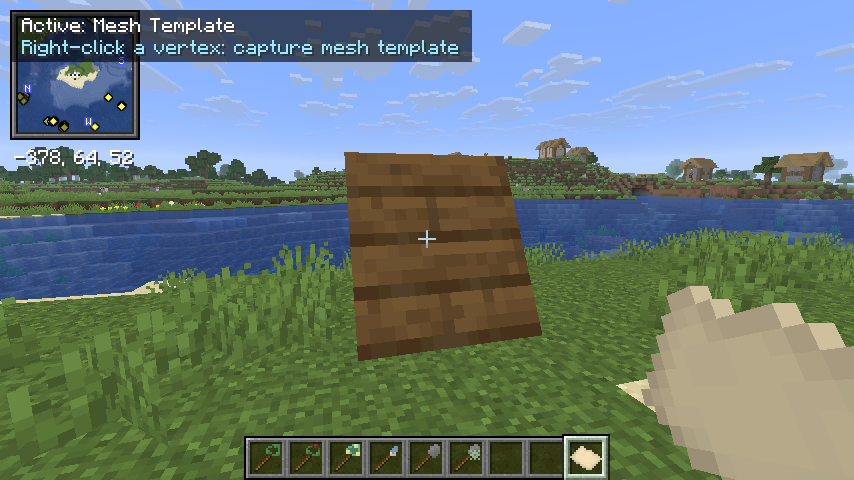
The blank item transforms into a distinct Saved Mesh Template; the original world mesh remains editable.
The Saved Mesh Template item contains only a small UUID reference, never the full face and vertex snapshot. Each captured or imported template is written as its own compressed file at:
<world save>/nmesh_templates/<template UUID>.nbt
That file contains the relative vertices, edges, faces, UVs, textures, rendered and collision states, movement materials, render settings, source name, and placement-origin information. Writes use a temporary file followed by an atomic replacement when the filesystem supports it, preventing a partial save from becoming the referenced template. Successfully loaded templates are cached for the life of the server, so repeatedly placing the same template does not repeatedly read the disk.
This keeps inventory and item synchronization small even for detailed imports. Saved Template items from earlier Neo's Meshes versions that contain embedded nmesh_template or meshmod_template data are migrated on their first use: a world file is created, the item receives its UUID reference, and the embedded geometry is removed.
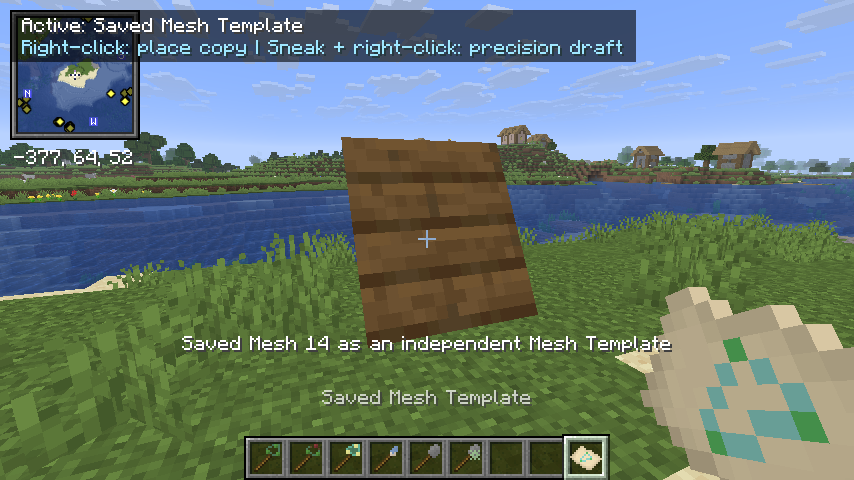
Normal right-click places an independent copy. Every copy receives new mesh, vertex, and face-group identities, so editing one copy does not modify the source or another copy. The placement origin lands at the current snapped vertex-placement point.
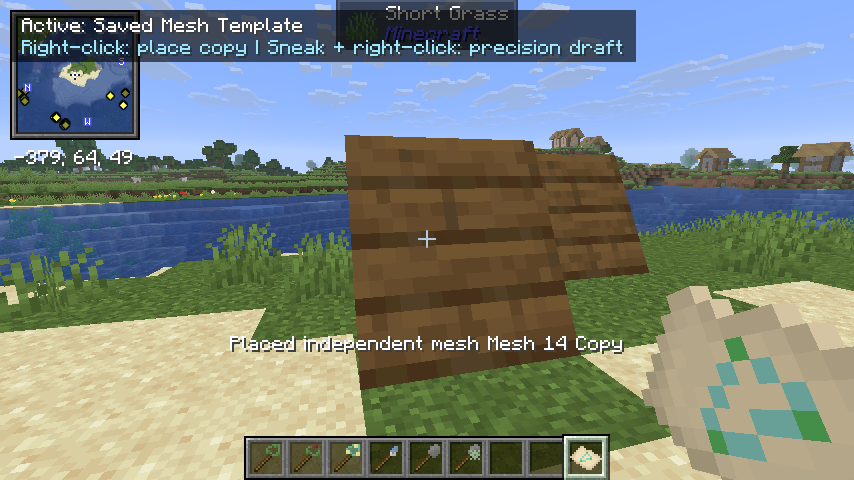
A normally placed copy is named Original Name Copy. Renaming the template item provides the placed mesh's name instead.
Precision Draft Mode
Sneak + right-click a Saved Mesh Template starts a transient preview without opening a screen or darkening the world.
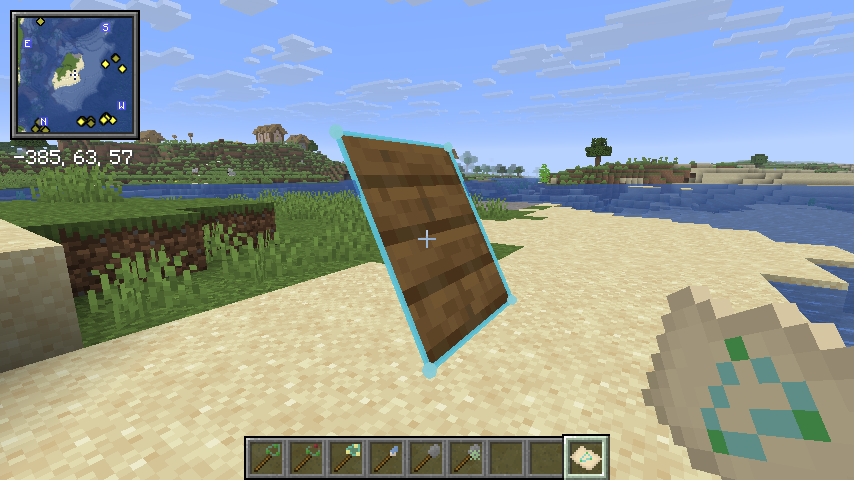
During draft mode:
- Mouse movement continues controlling the camera.
- Arrow keys provide ordinary player movement.
- Space still jumps.
- Q moves the draft up.
- Z moves it down.
- W moves it north.
- S moves it south.
- A moves it west.
- D moves it east.
- Movement uses fixed world axes and never changes with player or camera direction.
- Each movement step is
0.01blocks. - Shift + Q/Z rotates pitch by +/-1 degree.
- Shift + A/D rotates yaw by +/-1 degree.
- Shift + W/S rotates roll by +/-1 degree.
- Left-click confirms placement.
- Right-click cancels without creating anything.
- Opening another screen also cancels.
No permanent mesh is created until confirmation.
Persistence, Syncing, and Multiplayer
The server owns and validates edits. Clients handle input, menus, previews, and rendering.
- Each dimension has separate persistent mesh data.
- Every mesh has a UUID and revision.
- Every vertex has a persistent UUID and double-precision world position.
- Joining players receive a complete snapshot for their current dimension.
- Later edits synchronize only the changed mesh.
- Changing dimensions clears the player's active selection and sends the new dimension's meshes.
- Each player has an independent editor selection and face draft.
- Each player also has an independent transient Selection Tool box and bulk-action menu.
- All players in the dimension receive updated geometry.
- Imported texture assets and named
nmesh:<filename>item models persist globally with the world and synchronize to every client as a required generated pack/catalog. - Saved Mesh Template geometry persists globally in one immutable
nmesh_templatesfile per template; items synchronize only its UUID reference. - There is currently no operator or ownership restriction; anyone who obtains the tools can edit any targetable mesh.
Therefore, the correct distribution classification is:
- Client and server
- Required on both
- Works in singleplayer too
Legacy Compatibility
(At one point the namespace was meshmod, but was since then changed to nmesh for Neo's Meshes, so it does support meshmod just for compatibility on worlds that used that before.)
Compatibility includes:
- Hidden legacy
meshmod:*item registrations. - Old item models redirected to the current textures.
- Automatic migration from
meshmod:meshesworld data tonmesh:meshes. - Reading old
meshmod_templatetemplate data. - Converting older data-bearing blank template items into Saved Mesh Templates.
- Moving legacy embedded
nmesh_templateandmeshmod_templateitem geometry into UUID-named world files on first use. - Migrating old rendered and collision faces where possible.
- Intentionally discarding the obsolete collision-cutout representation.
Survival Recipes
(This isn't really meant for survival so that AI that coded this just added it in just in case. This is the only part that wasn't my idea.)
| Item | Pattern and ingredients |
|---|---|
| VertexTool | A / C / S - amethyst shard, copper ingot, stick |
| Mesh Delete Tool | FI / S - flint, iron ingot, stick |
| FaceTool | E / C / S - echo shard, copper ingot, stick |
| RenderTool | GL / S - glass, lapis lazuli, stick |
| CollisionTool | IR / S - iron ingot, redstone, stick |
| Collision Settings Tool | CR / S - copper ingot, redstone, stick |
| Mesh Template | P / PAP / P - four paper surrounding an amethyst shard |
Saved Mesh Templates have no separate crafting recipe.
Metadata and Compatibility
The JAR contains:
- The Neo's Meshes Mod Menu description.
- A bundled 256x256 example icon.
- English item, interface, tooltip, status, and error text.
- Dedicated item textures and models.
- Optional Sodium and Iris declarations.
- Model/persistence, per-template world-file storage, editor-geometry, exact-collision, area-selection, arbitrary-triangle item fitting, and embedded
.gltf/.glbimport self-tests used by the Gradlechecktask.
Current Limitations and Missing Verification
- Existing vertices cannot currently be moved directly; they can only be placed or deleted.
- There is no explicit "stop rendering this face" operation.
- The texture menu currently changes texture selection only. Persisted global color, alpha, double-sided, full-bright, UV scale, and offset fields do not have a current in-game editor.
- Legacy collision-resolution and thickness values are preserved in data/templates, but the current exact-triangle solver does not use them.
- Shader-pack appearance depends on the pack supporting Minecraft's entity-style cutout/translucent render pipelines.
- The importer intentionally rejects Draco compression, sparse accessors, KTX2/Basis Universal images, and non-triangle drawing primitives.
- A file-backed Saved Mesh Template is tied to its world save. Copying only the item into another world does not copy the referenced file.
- Template files are intentionally not automatically deleted when an item disappears, because unloaded inventories and copied items make it unsafe to prove that no reference remains.
- The current
README.mdcontains stale references to "five tools" and a two-block placement distance. The implementation uses the feature set described in this guide. - Automated fixtures verify template-file round trips, textual
.gltfand binary.glbparsing, embedded PNG conversion, UVs, node transforms, and the reduced editor-geometry budgets. The complete legacy-item migration, picker-to-multiplayer-resource-reload workflow, and resulting live frame rate still require in-game verification.
The blank item transforms into a distinct Saved Mesh Template; the original world mesh remains editable.
The Saved Mesh Template item contains only a small UUID reference, never the full face and vertex snapshot. Each captured or imported template is written as its own compressed file at:
<world save>/nmesh_templates/<template UUID>.nbt
That file contains the relative vertices, edges, faces, UVs, textures, rendered and collision states, movement materials, render settings, source name, and placement-origin information. Writes use a temporary file followed by an atomic replacement when the filesystem supports it, preventing a partial save from becoming the referenced template. Successfully loaded templates are cached for the life of the server, so repeatedly placing the same template does not repeatedly read the disk.
This keeps inventory and item synchronization small even for detailed imports. Saved Template items from earlier Neo's Meshes versions that contain embedded nmesh_template or meshmod_template data are migrated on their first use: a world file is created, the item receives its UUID reference, and the embedded geometry is removed.
Normal right-click places an independent copy. Every copy receives new mesh, vertex, and face-group identities, so editing one copy does not modify the source or another copy. The placement origin lands at the current snapped vertex-placement point.
A normally placed copy is named Original Name Copy. Renaming the template item provides the placed mesh's name instead.
Precision Draft Mode
Sneak + right-click a Saved Mesh Template starts a transient preview without opening a screen or darkening the world.
During draft mode:
- Mouse movement continues controlling the camera.
- Arrow keys provide ordinary player movement.
- Space still jumps.
- Q moves the draft up.
- Z moves it down.
- W moves it north.
- S moves it south.
- A moves it west.
- D moves it east.
- Movement uses fixed world axes and never changes with player or camera direction.
- Each movement step is
0.01blocks. - Shift + Q/Z rotates pitch by +/-1 degree.
- Shift + A/D rotates yaw by +/-1 degree.
- Shift + W/S rotates roll by +/-1 degree.
- Left-click confirms placement.
- Right-click cancels without creating anything.
- Opening another screen also cancels.
No permanent mesh is created until confirmation.
Persistence, Syncing, and Multiplayer
The server owns and validates edits. Clients handle input, menus, previews, and rendering.
- Each dimension has separate persistent mesh data.
- Every mesh has a UUID and revision.
- Every vertex has a persistent UUID and double-precision world position.
- Joining players receive a complete snapshot for their current dimension.
- Later edits synchronize only the changed mesh.
- Changing dimensions clears the player's active selection and sends the new dimension's meshes.
- Each player has an independent editor selection and face draft.
- Each player also has an independent transient Selection Tool box and bulk-action menu.
- All players in the dimension receive updated geometry.
- Imported texture assets and named
nmesh:<filename>item models persist globally with the world and synchronize to every client as a required generated pack/catalog. - Saved Mesh Template geometry persists globally in one immutable
nmesh_templatesfile per template; items synchronize only its UUID reference. - There is currently no operator or ownership restriction; anyone who obtains the tools can edit any targetable mesh.
Legacy Compatibility
(At one point the namespace was meshmod, but was since then changed to nmesh for Neo's Meshes, so it does support meshmod just for compatibility on worlds that used that before.)
Compatibility includes:
- Hidden legacy
meshmod:*item registrations. - Old item models redirected to the current textures.
- Automatic migration from
meshmod:meshesworld data tonmesh:meshes. - Reading old
meshmod_templatetemplate data. - Converting older data-bearing blank template items into Saved Mesh Templates.
- Moving legacy embedded
nmesh_templateandmeshmod_templateitem geometry into UUID-named world files on first use. - Migrating old rendered and collision faces where possible.
- Intentionally discarding the obsolete collision-cutout representation.
Survival Recipes
(This isn't really meant for survival so that AI that coded this just added it in just in case. This is the only part that wasn't my idea.)
| Item | Pattern and ingredients |
|---|---|
| VertexTool | A / C / S - amethyst shard, copper ingot, stick |
| Mesh Delete Tool | FI / S - flint, iron ingot, stick |
| FaceTool | E / C / S - echo shard, copper ingot, stick |
| RenderTool | GL / S - glass, lapis lazuli, stick |
| CollisionTool | IR / S - iron ingot, redstone, stick |
| Collision Settings Tool | CR / S - copper ingot, redstone, stick |
| Mesh Template | P / PAP / P - four paper surrounding an amethyst shard |
Saved Mesh Templates have no separate crafting recipe.
Metadata and Compatibility
The JAR contains:
- The Neo's Meshes Mod Menu description.
- A bundled 256x256 example icon.
- English item, interface, tooltip, status, and error text.
- Dedicated item textures and models.
- Optional Sodium and Iris declarations.
- Model/persistence, per-template world-file storage, editor-geometry, exact-collision, area-selection, arbitrary-triangle item fitting, and embedded
.gltf/.glbimport self-tests used by the Gradlechecktask.
Current Limitations and Missing Verification
- Existing vertices cannot currently be moved directly; they can only be placed or deleted.
- There is no explicit "stop rendering this face" operation.
- The texture menu currently changes texture selection only. Persisted global color, alpha, double-sided, full-bright, UV scale, and offset fields do not have a current in-game editor.
- Legacy collision-resolution and thickness values are preserved in data/templates, but the current exact-triangle solver does not use them.
- Shader-pack appearance depends on the pack supporting Minecraft's entity-style cutout/translucent render pipelines.
- The importer intentionally rejects Draco compression, sparse accessors, KTX2/Basis Universal images, and non-triangle drawing primitives.
- A file-backed Saved Mesh Template is tied to its world save. Copying only the item into another world does not copy the referenced file.
- Template files are intentionally not automatically deleted when an item disappears, because unloaded inventories and copied items make it unsafe to prove that no reference remains.
- The current
README.mdcontains stale references to "five tools" and a two-block placement distance. The implementation uses the feature set described in this guide. - Automated fixtures verify template-file round trips, textual
.gltfand binary.glbparsing, embedded PNG conversion, UVs, node transforms, and the reduced editor-geometry budgets. The complete legacy-item migration, picker-to-multiplayer-resource-reload workflow, and resulting live frame rate still require in-game verification.
- Edition: Minecraft Java
- File type: .jar
- Minecraft version listed: 26.1.2
- How to install: Install the matching mod loader (Forge, Fabric or NeoForge) for your Minecraft version. → Download the .jar. → Put it in the .minecraft/mods folder and launch that loader profile.
- Where to get it: Opens on Modrinth — not every file is mirrored on our own servers.
Install steps are the general flow for this file type — How to install Minecraft Java mods & modpacks walks through it step by step.
- Ships as nmesh-0.1.0.jar — drop this file into the mods folder
- Download size: 322 KB
- Download link checked 19 Oct 2026 — working
These come from our own check of the pack file, not from the source page.